
More project photos (2)
The problem
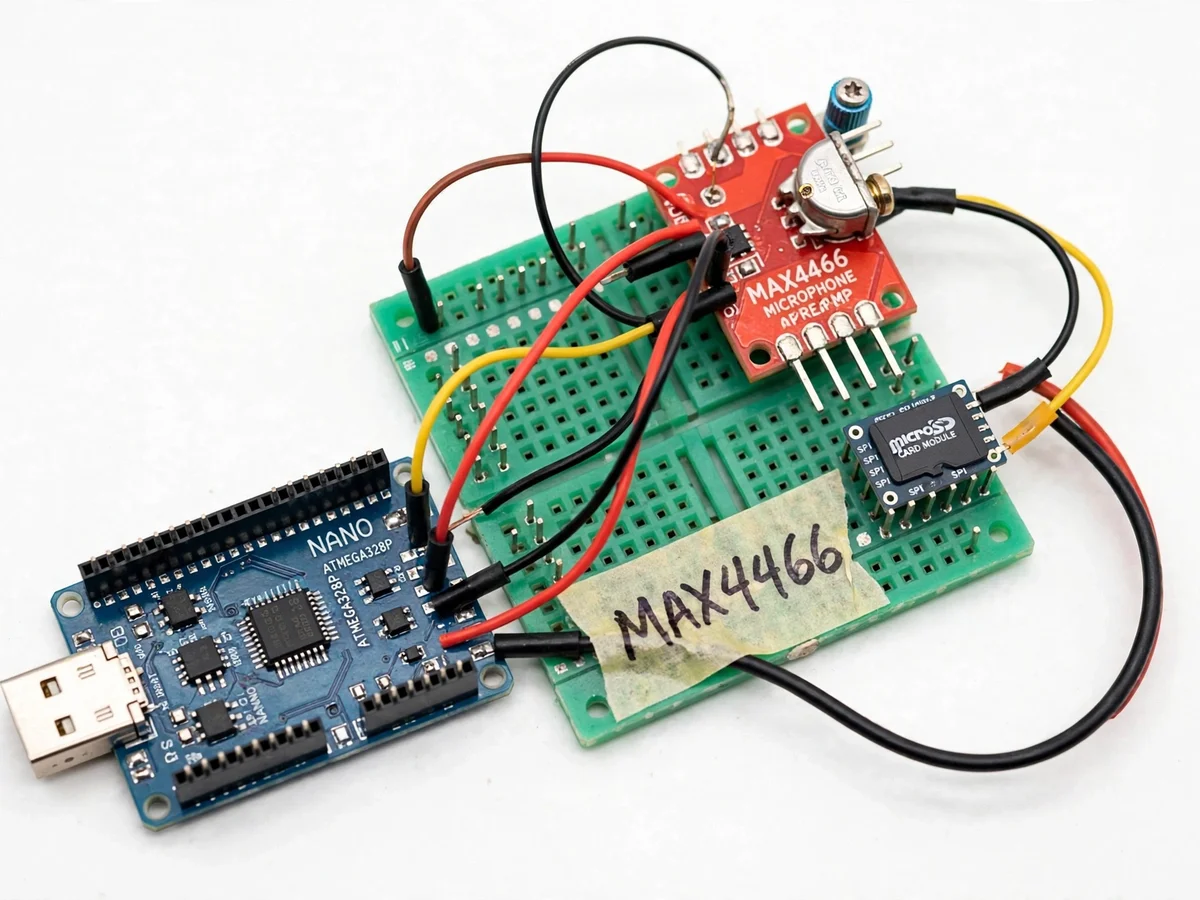
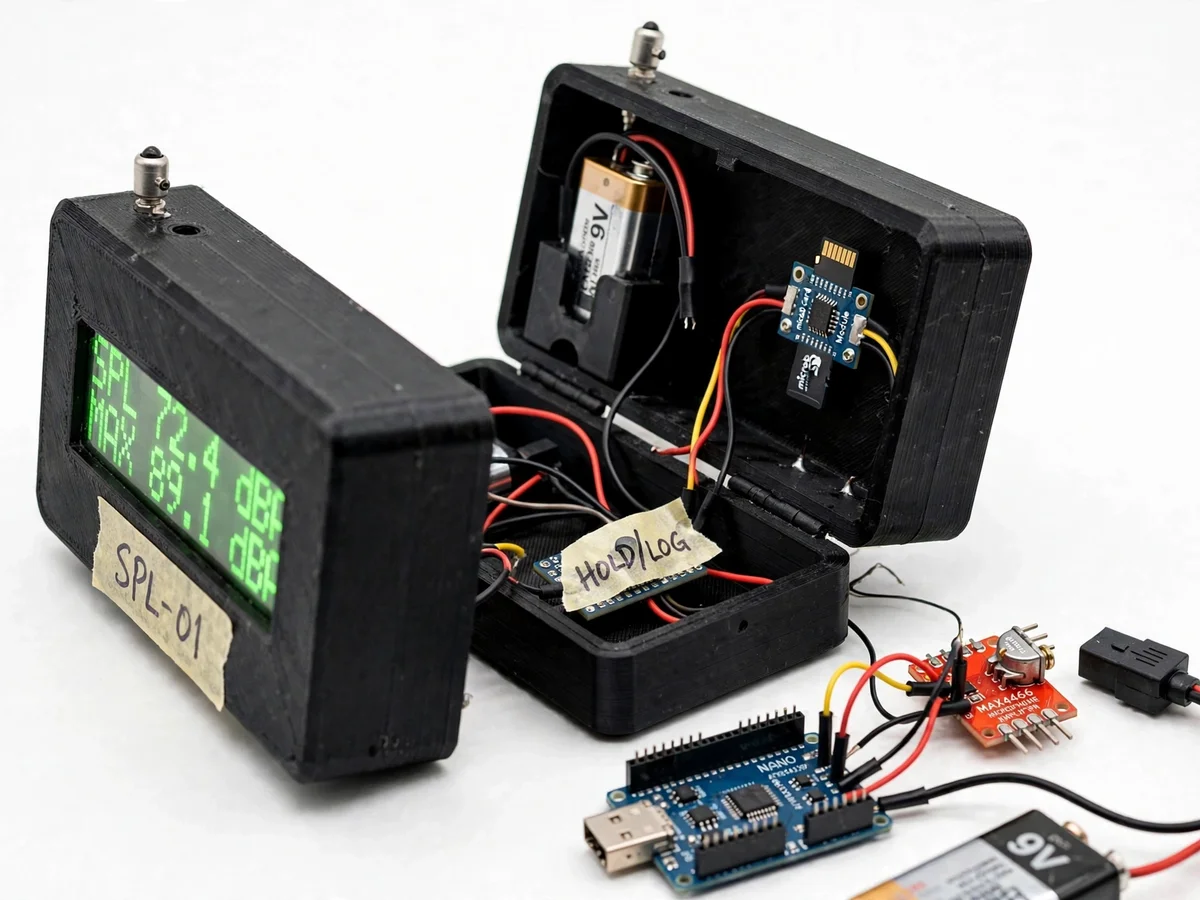
Noise exposure rules — factory floors, traffic junctions, concert venues, generator rooms — are written in decibels, yet real sound level meters cost enough to put them out of reach of most student experiments. An electret microphone capsule, a MAX4466 preamplifier and an Arduino Nano can do the job at a fraction of the cost, provided the signal chain is honest about what it is: the capsule converts pressure to voltage, the MAX4466 amplifies it with an adjustable 25x–125x gain, the Nano samples it at about 9.6 kHz, and the firmware applies an A-weighting digital filter, computes RMS over a 125 ms Fast window, and converts to decibels against a calibration offset. The result appears live on a 16x2 LCD as A-weighted SPL with 0.1 dB resolution, alongside peak-hold and min/max values — and every sample lands in a CSV file on a microSD card with an elapsed-time stamp. Because a student build cannot claim laboratory accuracy, the project ships with a single-point calibration procedure: the buyer sets the offset against a reference meter or a calibrated phone app at one known level (94 dB at 1 kHz is the standard), and the report documents that procedure rather than inventing measured results.
Capsule converts sound pressure to AC voltage (datasheet typical -44 dBV/Pa).
Follow the working sequence
How it works
- The electret microphone capsule on top of the enclosure picks up sound pressure and converts it to a small AC voltage (datasheet typical sensitivity −44 dBV/Pa).
- The MAX4466 preamplifier module boosts this signal with a trimpot-adjustable gain of 25x–125x to fit the Arduino's 0–5 V ADC range.
- The Arduino Nano samples the amplified waveform on a 10-bit analog input at approximately 9.6 kHz, fast enough to capture the audio band of interest.
- Firmware applies an A-weighting digital IIR filter to the sample stream, matching how human hearing perceives loudness across frequencies.
- RMS level is computed over a 125 ms Fast window; dB SPL is calculated as 20·log10(RMS) plus the buyer-set calibration offset, and shown live on the 16x2 LCD.
- The HOLD/LOG push-button freezes the current reading on the display and records the session peak; peak, minimum and maximum are tracked continuously.
- Once per second, the firmware writes a CSV row (elapsed seconds, SPL, peak) to the microSD card via SPI for later plotting and report analysis.
- The whole unit runs from a 9 V battery, and the calibration procedure in the guide aligns the meter's offset to a reference source before readings are taken.
Tech stack:
- Arduino Nano (ATmega328P, 10-bit ADC, 16 MHz)
- MAX4466 electret microphone preamplifier module (25x–125x adjustable gain)
- Electret microphone capsule (datasheet typical −44 dBV/Pa)
- 16x2 character LCD with I2C backpack
- microSD card module (SPI) with CSV logging
- A-weighting digital IIR filter in firmware
- 9 V battery, snap connector, 3D-printed handheld enclosure
- Arduino IDE (C/C++ firmware)
| Parameter | Value |
|---|---|
| Measurement range | 30–120 dBA (design target) |
| Calibration accuracy | ±3 dB at the single-point calibration level (design target, after buyer calibration) |
| Frequency weighting | A-weighting via firmware IIR filter (design target) |
| Time weighting | Fast, 125 ms RMS window (design) |
| Display | 16x2 character LCD, 0.1 dB display resolution (design) |
| Microphone sensitivity | −44 dBV/Pa (datasheet typical, electret capsule) |
| Preamp gain | 25x–125x adjustable via trimpot (MAX4466 module, datasheet) |
| ADC | 10-bit, 0–5 V input range (Arduino Nano, datasheet) |
| Sampling | Approximately 9.6 kHz (expected) |
| Logging | CSV to microSD, 1 sample per second (design) |
| Battery runtime | Approximately 8 hours with LCD backlight on (expected) |
| Enclosure | Handheld 3D-printed case with top-mounted mic (built) |
Project features
- [Live A-weighted SPL readout] The 16x2 LCD shows the current A-weighted sound pressure level in dBA with 0.1 dB display resolution, computed from an RMS window with a firmware A-weighting IIR filter — the weighting professional meters use.
- [Peak-hold and min/max capture] A HOLD/LOG button freezes the display reading and separately records the peak, minimum and maximum SPL of the session, so transient events like a machine startup can be captured and noted.
- [microSD CSV data logging] Every sample is written to a microSD card as a CSV row (elapsed time, SPL, session peak) at 1 sample/s, giving the student real data to plot and analyze in the report.
- [Buyer-run single-point calibration] Instead of claimed accuracy, the project documents the calibration procedure: the buyer plays a known reference tone or compares against a reference meter or calibrated app, and sets the offset so the meter reads correctly at the calibration point.
- [Handheld battery-powered build] A 9 V battery, an enclosed handheld case and a top-mounted electret capsule make the meter genuinely portable for field readings around a workshop or traffic junction.
- [Adjustable preamp gain] The MAX4466 module's onboard trimpot lets the gain be set between 25x and 125x, so the same build covers quiet rooms and loud machinery.
- [DS3231 RTC timestamping — optional] A real-time-clock module can be fitted so the CSV log carries wall-clock timestamps instead of elapsed-time stamps.
- [Threshold alarm with relay output — future scope] A future extension can add a buzzer or relay that fires when SPL crosses a set limit, turning the meter into a simple noise-alarm unit.
What is included
- Assembled handheld sound level meter (mic capsule, MAX4466 module, Arduino Nano, LCD, SD module, 9 V battery, enclosure)
- Complete Arduino firmware (sampling, A-weighting filter, SPL computation, peak/min/max, CSV logging)
- Wiring diagram and module connection guide
- Buyer-run calibration procedure document
- Project report PDF (theory, signal chain, calibration, sample logged data with plots)
- Abstract PDF (10-section)
- PPT presentation for final review
- Viva Q&A preparation document (dB math, A-weighting, ADC resolution, calibration concepts)
Limitations & prerequisites
- Accuracy is a design target, not a measured result: a student build is not a calibrated Type 2 meter, and the honest accuracy claim is what the buyer verifies at their calibration point.
- The A-weighting is a firmware filter approximation; at the edges of the audio band it deviates from a professional meter's analog weighting network.
- A single-point calibration aligns the meter at one level and one frequency — readings far from that point carry larger error, and the report explains why.
- The electret capsule's frequency response is not flat, so the meter measures relative SPL faithfully but is not a reference instrument for absolute legal measurements.
- Wind noise and handling noise affect readings; the meter has no windshield, so outdoor measurements need still air or a foam cover.
- The 10-bit ADC limits the dynamic range of a single gain setting — very loud sources may clip and very quiet ones may sit near the noise floor until the gain is re-adjusted.
- CSV timestamps are elapsed seconds unless the optional RTC module is fitted.
Frequently Asked Questions
How does the meter actually compute decibels?
The MAX4466 amplifies the electret capsule's signal into the Arduino's 0–5 V ADC range. Firmware samples at about 9.6 kHz, runs the samples through an A-weighting digital filter, computes RMS over a 125 ms window, and converts to dB with the formula 20·log10(RMS) plus a calibration offset the buyer sets during the documented calibration step.
Is this accurate enough for a real noise survey?
Honestly, no — it is not a calibrated Type 2 instrument and should not be used for legal compliance measurements. It is a working student instrument with a ±3 dB design target at its calibration point, and the report documents the calibration procedure and its limits rather than inventing test results.
What do I need to calibrate it?
A reference source: either access to a real sound level meter, a 1 kHz calibrator tone, or a calibrated phone app (like the NIOSH SLM app) in a stable environment. The guide walks through comparing readings at one known level and setting the firmware offset so the meter agrees there.
What comes out of the SD card logging?
A CSV file with one row per second: elapsed time, SPL in dBA, and the session peak. The student can open it in Excel and plot noise-vs-time curves for the report — for example, SPL across a traffic rush hour or before and after switching on a machine.
Can it run on battery during a field survey?
Yes — the 9 V battery gives about 8 hours of expected runtime with the LCD backlight on, which covers a full day of spot measurements. The backlight can be dimmed in firmware if longer runs are needed.
Is this project suitable for a final-year project?
Yes — for Electronics and E&TC programs. It spans analog signal conditioning, digital filtering, microcontroller interfacing and data logging in one portable build, and the calibration procedure plus honest-accuracy discussion give genuinely strong viva material on measurement science.
Components & software requirements
- Arduino Nano (ATmega328P, 10-bit ADC, 16 MHz)
- MAX4466 electret microphone preamplifier module (25x–125x adjustable gain)
- Electret microphone capsule (datasheet typical −44 dBV/Pa)
- 16x2 character LCD with I2C backpack
- microSD card module (SPI) with CSV logging
- A-weighting digital IIR filter in firmware
- 9 V battery, snap connector, 3D-printed handheld enclosure
- Arduino IDE (C/C++ firmware)
Delivery information
Built-to-order project. Delivery timeline is shared after order confirmation based on current queue.
Support terms
Complete documentation, setup guide, and viva preparation included. Support for setup and explanation provided.
Download free synopsis (PDF)
Enter your name and WhatsApp number — the synopsis PDF downloads immediately. We may send occasional project updates on WhatsApp; no spam.