
More project photos (3)
The problem
Bug reports, design feedback and tutorial-making all need the same thing: take a screenshot, draw on it, send it. The usual options are OS-specific snipping tools with one or two markup pens, or heavyweight editors that take a minute to open for a ten-second job. This project builds MarkShot, a browser-based annotation tool with a proper toolbelt: freehand pen, translucent highlighter, arrows with filled heads, rectangles, ellipses, text labels, a pixelation-blur brush for redacting sensitive regions, and an eraser — plus full undo/redo and one-click PNG export. Captures enter through file upload or direct clipboard paste, so a Print-Screen → paste → annotate → export loop takes seconds. Strokes are kept as objects on a layered canvas (base image untouched underneath), which is what makes non-destructive undo/redo and the flatten-on-export model work. The demo ships with a sample photograph as the capture and a scripted annotation set that exercises every tool, so all three gallery views demonstrate real functionality. Everything is one dependency-free HTML file.
Pastes a screenshot and annotates it with markup tools.
Follow the working sequence
How it works
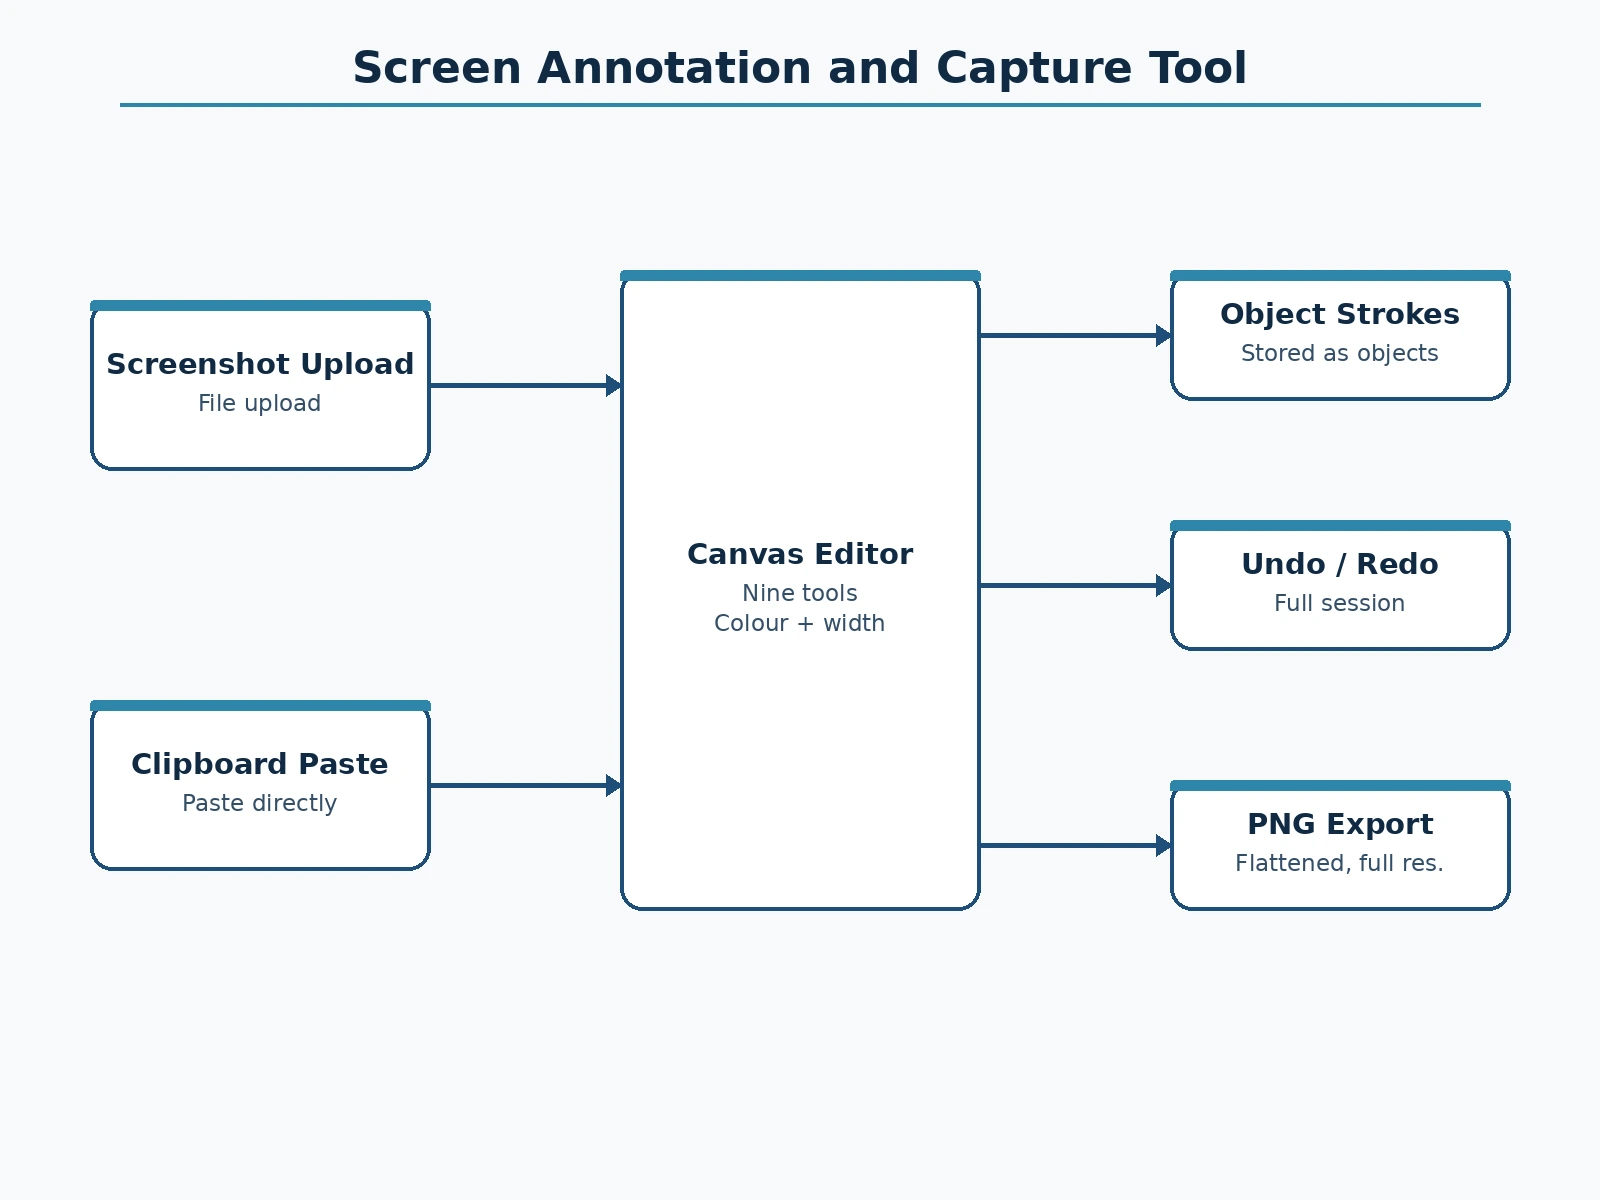
- The user pastes a screenshot from the clipboard or opens an image file; it becomes the base layer of the canvas.
- Selecting a tool (pen, arrow, shape, text, blur…) and clicking/dragging on the canvas creates a stroke object with color and width.
- Mouse-move renders a live ghost preview; mouse-up commits the stroke to the stroke list and clears the redo stack.
- The render loop draws the untouched base image first, then replays every stroke object in order — undo pops the last object, redo restores it.
- The blur tool captures its drag region, downscales it to 1/8th and draws it back up, producing the pixelation effect.
- Export composites the base plus all strokes onto an offscreen canvas at full resolution, shows the preview, and offers the PNG download.
Tech stack:
- HTML5 Canvas (layered rendering)
- Vanilla JavaScript (ES6+)
- Clipboard API (image paste)
- FileReader API (image upload)
- Canvas compositing (flatten on export)
- No frameworks, no build tools, no dependencies
| Parameter | Value |
|---|---|
| Annotation tools | 9 (pen, highlighter, arrow, rect, ellipse, text, blur, eraser, select) |
| Stroke storage | Object list, full-session undo/redo (design) |
| Blur method | 1/8 downscale-upscale pixelation (design) |
| Input methods | Clipboard paste, file upload |
| Export | PNG at full capture resolution |
| Base image | Never modified; annotations are an overlay layer |
| Footprint | Single HTML file, ~120 KB with sample photo (expected) |
| Browser support | Any modern Chromium/Firefox (expected) |
Project features
- [Nine annotation tools] Pen, highlighter, arrow, rectangle, ellipse, text, pixelation blur, eraser and select — a complete markup toolbelt.
- [Clipboard paste] Paste a screenshot straight from the clipboard; no save-to-file round trip needed.
- [File upload] Open any local image as the annotation canvas.
- [Object-based strokes] Every annotation is stored as an object, enabling true multi-level undo and redo across the session.
- [Pixelation blur] Drag a region to redact it with a downscale-upscale pixelation pass — for passwords, faces and keys in screenshots.
- [Color & width control] Per-stroke color picker and four stroke widths, shown live in the status bar.
- [PNG export dialog] Preview of the flattened result at full capture resolution with one-click download.
What is included
- Complete single-file annotation tool source (HTML/CSS/JS)
- Sample capture photograph with scripted annotation demo
- Three screenshot-ready demo views (clean, annotated, export dialog)
- Project report PDF (canvas layering design, stroke model, code walkthrough, limitations)
- PPT presentation for final review
- Viva Q&A preparation document (canvas API, compositing, clipboard security model)
- Setup and usage guide
Limitations & prerequisites
- Captures come from file or clipboard — the browser build cannot hook the OS screen-capture API; a native wrapper is listed as future scope.
- Clipboard image paste requires the page to have focus and clipboard-read permission; the file-upload path always works as fallback.
- The eraser removes whole strokes (object-level), not partial stroke segments.
- Export is PNG only; JPG/WebP export with quality control is listed as an extension.
- Very large images (40+ MP) may render slowly on low-end machines since every stroke replays each frame.
Frequently Asked Questions
Why is the base image never modified?
Annotations live as stroke objects on an overlay layer. That is what makes undo/redo trivial (drop or restore objects) and guarantees the original capture is never degraded by markup experiments.
How does the blur redaction work?
The dragged region is copied to a tiny offscreen canvas (1/8 scale) and drawn back up with smoothing on — a true pixelation pass, not a semi-transparent box, so the underlying pixels are genuinely unrecoverable in the export.
Can screenshots be pasted directly?
Yes — the Paste button reads image data from the clipboard via the Clipboard API. If the browser blocks it, the file-upload button covers the same flow.
What resolution is the export?
Full capture resolution: the export composites base plus strokes on an offscreen canvas sized to the original image, so nothing is downscaled.
Is this project suitable for a final-year project?
Yes — for Computer Science, IT and related programs. It demonstrates canvas rendering, an object-based document model, clipboard/file APIs and a real utility workflow. Suitable for B.E./B.Tech final-year projects in Computer Science, IT and related programs.
Components & software requirements
- HTML5 Canvas (layered rendering)
- Vanilla JavaScript (ES6+)
- Clipboard API (image paste)
- FileReader API (image upload)
- Canvas compositing (flatten on export)
- No frameworks, no build tools, no dependencies
Delivery information
Built-to-order project. Delivery timeline is shared after order confirmation based on current queue.
Support terms
Complete documentation, setup guide, and viva preparation included. Support for setup and explanation provided.
Download free synopsis (PDF)
Enter your name and WhatsApp number — the synopsis PDF downloads immediately. We may send occasional project updates on WhatsApp; no spam.