
More project photos (2)
The problem
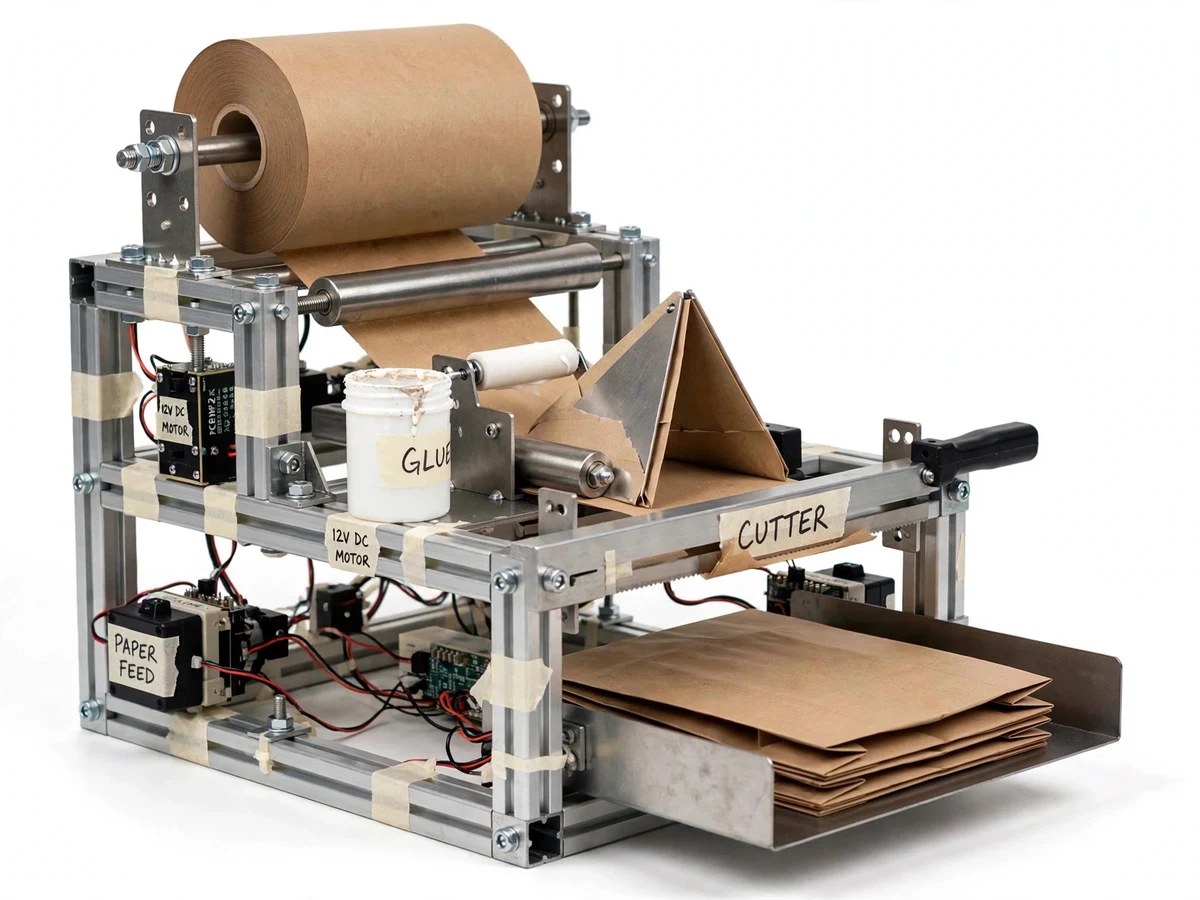
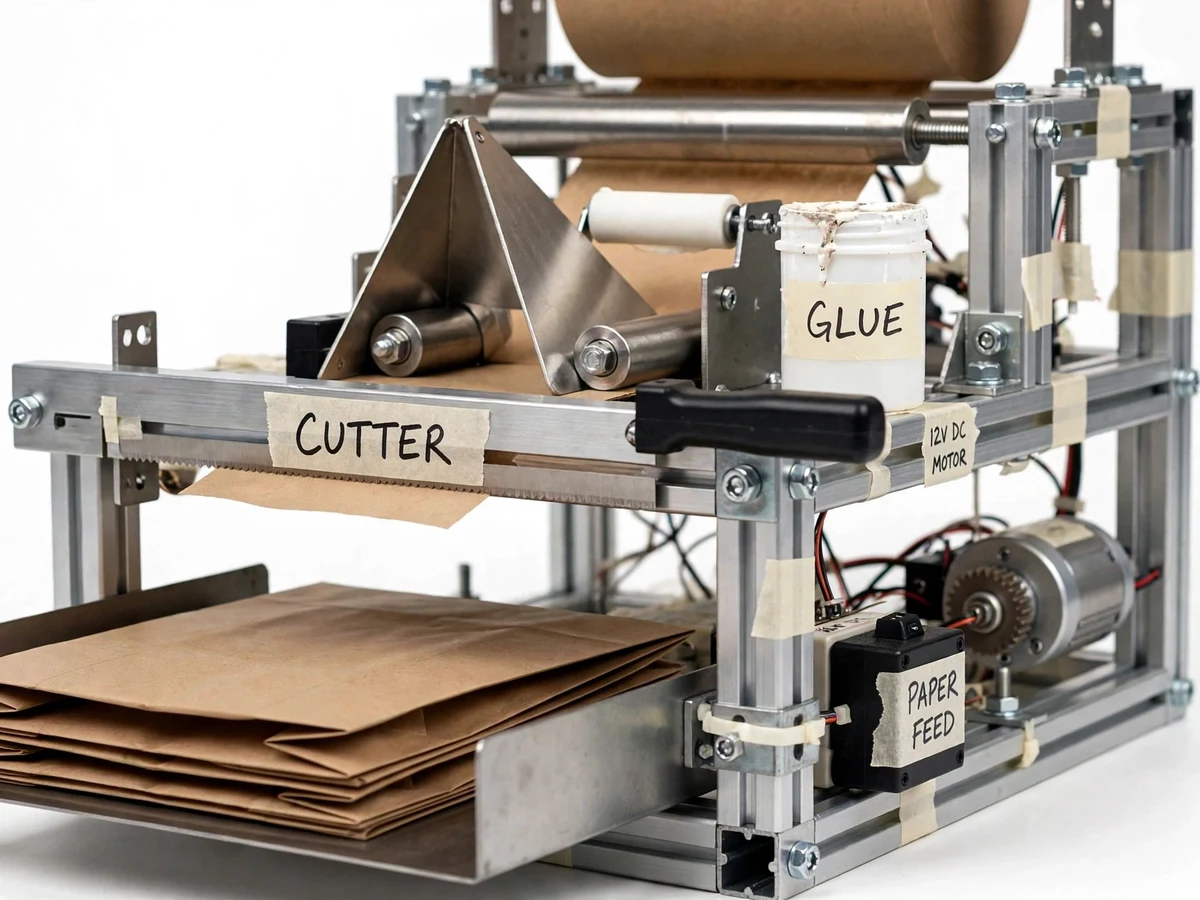
Plastic carry-bag bans have pushed shops toward paper bags, but the machines that make them are industrial-scale, expensive, and out of reach for a college lab — students usually study the process only from videos. The gap this project fills is a student-scale, fully visible paper bag making machine: kraft paper feeds from a roll, a triangular forming board folds it into a tube, an applicator roller lays the side-seam glue, a pressure roller seals it, and a serrated blade cuts the sealed tube into bag blanks. Every mechanism — feed rollers, chain reduction, forming geometry, glue application, cutting stroke — is exposed, labeled and adjustable, so the machine is a teaching rig as much as a working prototype. The bottom fold remains a manual finishing step, documented as a procedure the student performs on the cut blanks.
How it works
- A kraft paper roll (design target 60–90 GSM, approximately 300 mm web width) is loaded on the spindle and the web is threaded through the steel nip rollers.
- The operator switches on the 12 V drive and sets the feed speed with the PWM knob; the gear motor pulls the web forward through the chain reduction.
- The triangular forming board folds the web edges inward into a tube while the adjustable side guides hold the selected bag width.
- The glue applicator roller coats one folded edge with PVA adhesive from the pot, and the pressure roller seals the side seam flat.
- The operator slides the serrated blade across the sealed tube at the stop position, cutting one bag blank per stroke; blanks drop into the collection tray.
- The student takes the stacked blanks through the documented bottom-fold and bottom-glue procedure to finish each bag, verifying seam adhesion with the included peel test.
Tech stack:
- Aluminum extrusion + mild steel bolted frame
- 12 V DC gear motor (datasheet)
- Chain drive reduction
- Steel nip and pressure rollers
- Triangular sheet-metal forming board
- Glue pot + applicator roller (PVA cold glue)
- Serrated cross-cut blade on sliding bar
- PWM speed controller · fused 12 V supply
| Parameter | Value |
|---|---|
| Bag width | Approximately 15–25 cm (adjustable side guides) |
| Bag length | Approximately 20–35 cm (adjustable cut stop) |
| Paper stock | Kraft roll, design target 60–90 GSM, approximately 300 mm web width |
| Drive motor | 12 V DC gear motor, approximately 30 RPM shaft speed (datasheet) |
| Throughput | Approximately 4–6 flat blanks per minute (design target, operator-paced cut) |
| Power supply | 12 V DC, approximately 2 A, fused |
| Frame | Aluminum extrusion + mild steel brackets, bolted construction |
| Overall size | Approximately 65 × 45 × 50 cm (design target) |
| Weight | Approximately 12–15 kg (design target) |
| Adhesive | PVA cold glue in removable pot; seam cure per glue datasheet |
Project features
- [Motorized roll feed] A 12 V DC gear motor drives the steel feed rollers through a chain reduction, drawing kraft paper smoothly from the roll without hand feeding. A PWM speed knob sets the feed rate, so the demo can run slowly for explanation or faster for batch cutting.
- [Forming and folding station] A triangular sheet-metal forming board turns the flat paper web into a tube while adjustable side guides fold the edges inward. Bag width is set from approximately 15 to 25 cm by repositioning the guides — no rebuild needed.
- [Side-seam gluing unit] An applicator roller dips into a removable glue pot and lays a continuous adhesive line on the folded edge; a pressure roller seals the seam immediately after. The pot lifts out for cleaning and refilling between runs.
- [Cross-cut blade] A serrated blade on a sliding bar slices the sealed tube into bag blanks, with the cut position set by an adjustable stop for bag lengths from approximately 20 to 35 cm. The handle gives the operator positive, repeatable cutting strokes.
- [Collection tray] A bent-sheet-metal tray at the discharge end catches the cut blanks flat and stacked, its angled lip keeping the stack from sliding back under the blade. Blanks come off the machine ready for the bottom-fold procedure.
- [Bolted prototype frame] The frame is built from aluminum extrusion and mild-steel brackets joined with through-bolts — no welding — so every joint can be disassembled, measured and redrawn for the fabrication chapter of the report.
- [Labeled control wiring] A fused 12 V supply, stop switch and speed controller with reverse for clearing jams are wired in a labeled box; each station carries handwritten tape tags that match the assembly diagram in the documentation.
- [Bottom-fold procedure (manual, documented)] The prototype outputs cut tube blanks; converting them into usable bags needs a manual bottom fold and bottom glue line. This is documented as a step-by-step finishing procedure — an automatic bottom-fold station is future scope, stated openly.
What is included
- Working motorized paper bag making machine prototype
- Fabrication drawings (frame layout, forming board profile, roller arrangement, wiring)
- Bill of materials with sourced-part specifications
- Build and assembly documentation with station-by-station photos
- Bottom-fold finishing procedure sheet with seam peel test
- Project report PDF (background, mechanism design, fabrication, operation, testing plan)
- PPT presentation for final review
- Viva Q&A preparation document (paper feeding, forming theory, drives, gluing, cutting)
Limitations & prerequisites
- The prototype cuts flat tube blanks; the bottom fold and bottom glue are manual steps performed by the student per the procedure — the machine does not auto-fold bag bottoms.
- The 4–6 blanks/minute figure is a design target paced by the manual cut stroke, not a measured production rate, and is far below industrial bag machines.
- Seam strength depends on the PVA glue used and its cure time; the student verifies adhesion on their own build with the included peel test procedure.
- Paper outside approximately 60–90 GSM may mis-feed or jam; very thin or very stiff stock is out of scope.
- Bag size is limited by the guide and stop adjustments (approximately 15–25 cm wide, 20–35 cm long); square-bottom or handled bag styles are out of scope.
- This is a single-operator demonstration prototype, not a certified production unit; all electrical work must be checked by faculty before use.
Frequently Asked Questions
Does the machine make finished bags by itself?
It forms, side-seam glues and cuts the paper tube into blanks automatically under motor drive. The bottom fold and bottom glue are manual finishing steps documented in the procedure the student performs — standard for a student-scale prototype, and stated openly in the report.
What can I adjust and demonstrate in the viva?
Bag width via the side guides, bag length via the cut stop, feed speed via the controller, and roller pressure via the adjustable brackets — four real, measurable parameters the student sets, measures and discusses.
What paper does it use?
Standard kraft paper rolls, design target 60–90 GSM with approximately 300 mm web width. Rolls are widely available from packaging suppliers, and the bill of materials lists the exact stock specification.
Is the glue food-safe?
No. The prototype uses ordinary PVA cold glue, which is not rated for direct food contact. The report states this limit explicitly; the bags suit dry goods and general carry use.
Is this project suitable for a final-year project?
Yes — for Mechanical and Manufacturing programs. It covers machine design (frame, drives, rollers), manufacturing (fabrication, assembly), and process thinking (feed, form, seal, cut), with drawings and a physical machine to demonstrate.
Components & software requirements
- Aluminum extrusion + mild steel bolted frame
- 12 V DC gear motor (datasheet)
- Chain drive reduction
- Steel nip and pressure rollers
- Triangular sheet-metal forming board
- Glue pot + applicator roller (PVA cold glue)
- Serrated cross-cut blade on sliding bar
- PWM speed controller · fused 12 V supply
Delivery information
Built-to-order project. Delivery timeline is shared after order confirmation based on current queue.
Support terms
Complete documentation, setup guide, and viva preparation included. Support for setup and explanation provided.
Download free synopsis (PDF)
Enter your name and WhatsApp number — the synopsis PDF downloads immediately. We may send occasional project updates on WhatsApp; no spam.