
More project photos (2)
The problem
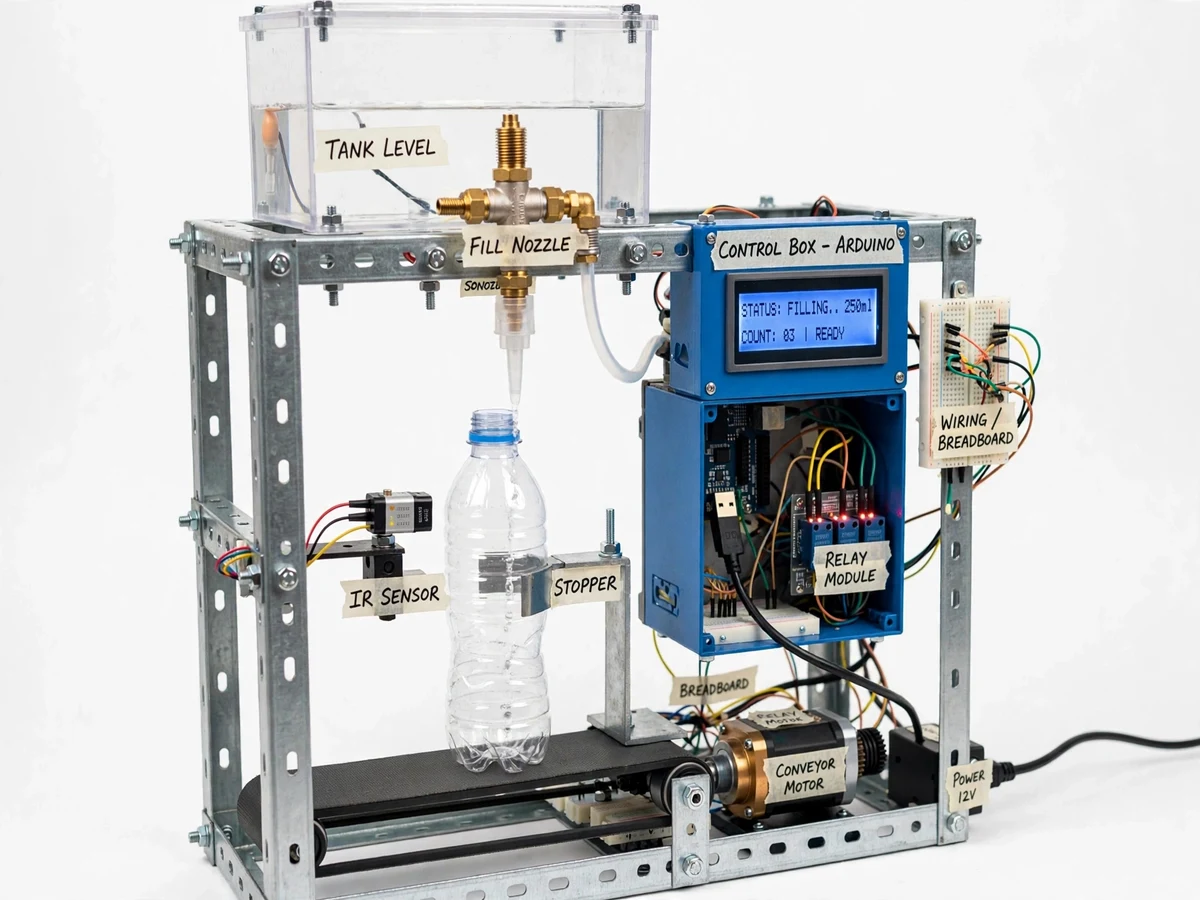
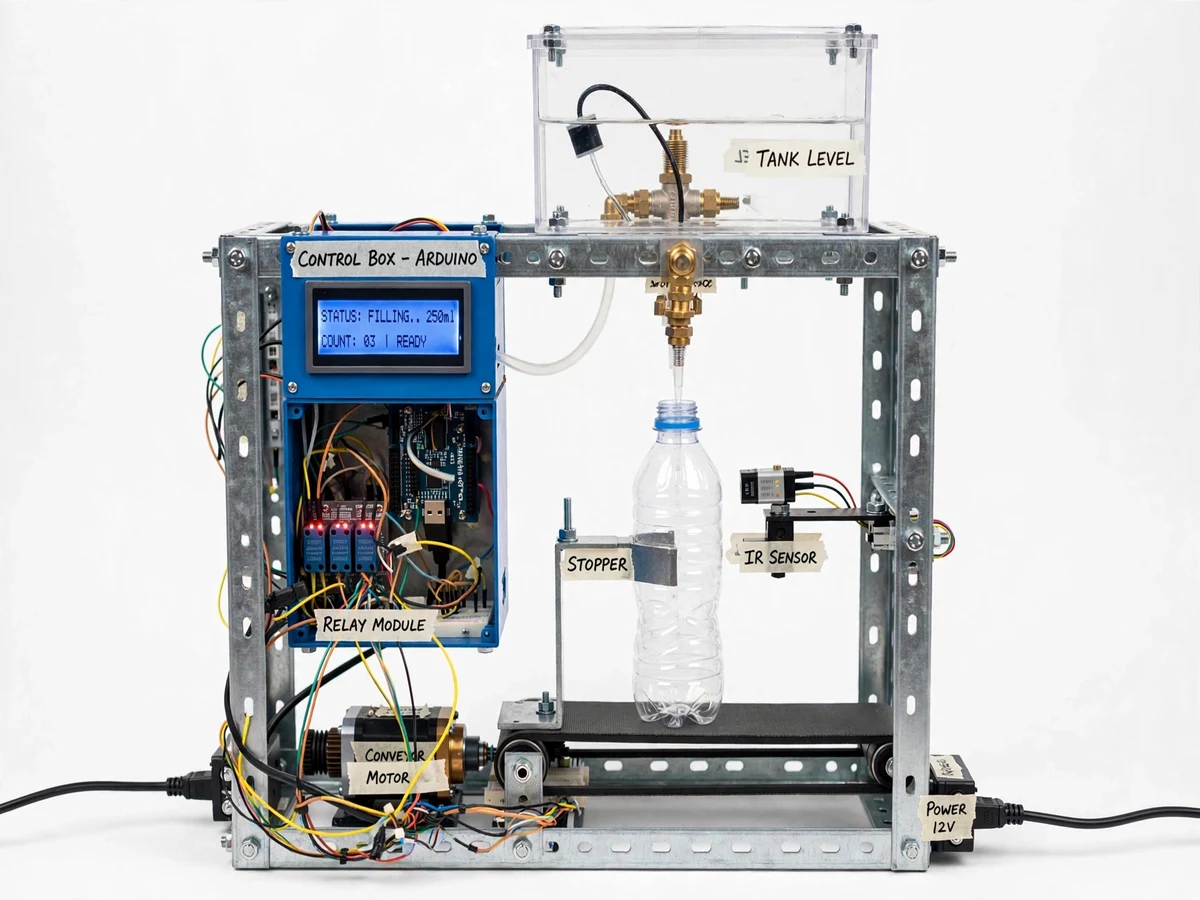
Small bottling units, hostel canteens, ayurvedic pharmacies and campus beverage stalls still fill bottles by hand with a jug or a tap: every pour is a different volume, spilling is routine, and one operator can manage only a few bottles a minute. Commercial filling machines solve this, but even a semi-automatic unit costs more than most student budgets and hides its working inside a sealed cabinet. This project rebuilds the core of that machine at student scale and in the open. A small belt conveyor indexes empty PET bottles into a fill station, an IR proximity sensor detects each bottle and stops the conveyor, and a solenoid valve above opens for a buyer-calibrated time to deliver a repeatable fill volume from an overhead gravity tank. A float level sensor in the feed tank prevents dry-run operation, and the Arduino controller reports status and bottle count on an LCD. Capping, labeling and pumping are deliberately out of scope, so the project stays focused on the sensing-and-actuation loop that is the heart of automated filling.
Detects each empty PET bottle as it enters the fill station on the belt conveyor.
Follow the working sequence
How it works
- Empty PET bottles are placed on the belt conveyor, which runs until the IR sensor detects a bottle entering the fill station; the mechanical stopper aligns it under the nozzle.
- The Arduino stops the conveyor motor through the relay module and opens the solenoid valve for the configured fill time.
- Liquid flows by gravity from the overhead tank through the nozzle into the bottle; fill volume equals valve-open time multiplied by the flow rate measured during buyer calibration.
- The valve closes, the conveyor restarts, and the bottle indexes forward while the next bottle moves into the station; the LCD increments the bottle count.
- The float level sensor continuously monitors the feed tank; if the level drops below the safe mark, the controller finishes the current bottle, then blocks further fills and shows "TANK LOW" on the LCD.
- The buyer recalibrates fill time for a different bottle size or liquid viscosity using the included measuring-cylinder procedure, then continues production.
Tech stack:
- Arduino Uno (ATmega328P) — main controller
- IR proximity sensor module (bottle detection)
- 12 V solenoid valve + adjustable fill nozzle (timed fill)
- Float level switch in overhead feed tank (dry-run protection)
- 12 V DC gear motor + belt conveyor with stopper bracket (indexing)
- 2-channel relay module (motor and valve switching)
- 16x2 character LCD (status, volume, bottle count)
- MS angle / aluminium slotted frame, 12 V SMPS supply
| Parameter | Value |
|---|---|
| Bottle sizes handled | 200 ml to 1 L PET bottles (design target) |
| Fill volume control | Valve-open time × measured flow rate, buyer-calibrated (expected) |
| Fill repeatability | Approximately ±10 ml on 250 ml water fills (expected, after buyer calibration) |
| Conveyor | Approximately 600 mm belt length, DC gear motor drive (design target) |
| Cycle rate | Approximately 6–10 bottles per minute at 250 ml (expected, liquid-dependent) |
| Feed tank capacity | Approximately 10 L overhead gravity tank (design target) |
| Sensors | IR proximity (bottle) + float level switch (tank) |
| Controller | Arduino Uno, relay-switched 12 V loads |
| Display | 16×2 LCD: READY / FILLING / TANK LOW, volume, count |
| Power | 12 V DC SMPS, approximately 60 W peak (design target) |
Project features
- [Automatic bottle indexing] A belt conveyor driven by a 12 V DC gear motor moves bottles into the fill station and advances to the next bottle after each fill, with a mechanical stopper bracket that positions every bottle repeatably under the nozzle.
- [IR bottle detection] An IR proximity sensor at the fill station detects each arriving bottle and signals the Arduino to stop the conveyor, so filling starts only when a bottle is correctly positioned.
- [Timed solenoid fill] A 12 V solenoid valve releases liquid from the overhead gravity tank for a calibrated open-time; fill volume equals open-time × measured flow rate, adjustable for 200 ml to 1 L bottles (approximate).
- [Tank level protection] A float level sensor in the feed tank signals low level, and the controller blocks the fill cycle (dry-run prevention) with a "TANK LOW" message on the LCD until refilled.
- [Live status display] A 16×2 LCD shows READY / FILLING / TANK LOW states, the configured fill volume and a running bottle count for the demo session.
- [Adjustable fill head] The nozzle height adjusts on a slotted bracket to suit different bottle heights, and the valve open-time is set through a simple button interface for buyer calibration.
- [Relay-driven actuation] Conveyor motor and solenoid valve are switched through a relay module with proper 5 V/12 V supply separation, demonstrating safe mixed-voltage prototyping practice.
- [Buyer calibration procedure] A documented fill-volume calibration method: measure flow rate at the buyer's own head height, compute open-time, and verify with a measuring cylinder — included in the report.
What is included
- Fabricated filling machine rig: slotted frame, belt conveyor, overhead tank, fill nozzle with solenoid valve, stopper bracket, sensors and control box
- Arduino firmware with timed-fill, indexing, level-protection and LCD logic, commented for viva explanation
- Wiring diagram and connection table for the control box
- Fill-volume calibration procedure with measurement template
- Project report PDF (background, mechanism, sensors, control logic, calibration, results)
- PPT presentation for final review
- Viva Q&A preparation document (sensors, actuators, timing control, safety interlocks)
Limitations & prerequisites
- Gravity-fed fill: viscous liquids (oils, syrups) fill slowly and need buyer re-calibration; carbonated beverages are out of scope.
- Fill accuracy is volumetric-by-time, not weigh-scale feedback — approximately ±10 ml on 250 ml fills after buyer calibration; the report states measured figures, never claimed ones.
- No capping, sealing or labeling stage is included — filling and indexing only; these are available as optional customization, not in the base build.
- Throughput is demonstrator-scale (approximately 6–10 bottles/min at 250 ml) — nowhere near industrial rotary fillers, and the build makes no industrial throughput claims.
- The rig handles PET bottles of similar diameter (200 ml to 1 L, approximate); odd shapes need bracket adjustment.
- This is a built-to-order prototype: every fill figure is buyer-calibrated on their own machine; no fill accuracy is promised as a measured number before calibration.
Frequently Asked Questions
How does the machine know when to start and stop filling?
An IR proximity sensor at the fill station detects each bottle arriving on the conveyor. The Arduino stops the conveyor motor through the relay, holds the bottle under the nozzle with a stopper bracket, opens the solenoid valve for the configured time, closes it, then restarts the conveyor to index the next bottle — a fully automatic loop.
How is the fill volume set?
Fill volume equals solenoid valve-open time multiplied by the liquid's flow rate at the tank head height. The included calibration procedure has you measure the actual flow rate with a measuring cylinder, compute the open-time for your target volume, and verify it — documented in the report so the viva numbers are your own measurements.
What does the level sensor do?
A float level switch sits in the overhead feed tank. When liquid drops below the safe mark, the controller blocks new fill cycles and shows "TANK LOW" on the LCD, preventing dry-run and air ingress into the line. Refill, and the machine resumes automatically.
Does it cap or label the bottles?
No. The base build covers conveying, bottle detection, timed filling and tank-level protection only. Capping and labeling are mechanical additions that can be quoted as optional customization — the project focuses on the sensing-and-actuation control loop, which is the core final-year-worthy engineering.
What liquids can it fill?
Water and other thin liquids (juices, oils with thin viscosity, herbal extracts) work well. Thick syrups fill slowly through the gravity nozzle and need re-calibration; carbonated drinks lose fizz and are out of scope. The calibration procedure covers adapting to a new liquid.
Is this project suitable for a final-year project?
Yes — for Mechanical, Mechatronics and related programs. It combines machine fabrication, belt-conveyor design, sensor interfacing and timed actuation control into one demonstrable system, and the buyer-run calibration procedure gives the student real measured data for the dissertation. The report, PPT and viva Q&A included cover mechanism, control logic and calibration for the final review.
Components & software requirements
- Arduino Uno (ATmega328P) — main controller
- IR proximity sensor module (bottle detection)
- 12 V solenoid valve + adjustable fill nozzle (timed fill)
- Float level switch in overhead feed tank (dry-run protection)
- 12 V DC gear motor + belt conveyor with stopper bracket (indexing)
- 2-channel relay module (motor and valve switching)
- 16x2 character LCD (status, volume, bottle count)
- MS angle / aluminium slotted frame, 12 V SMPS supply
Delivery information
Built-to-order project. Delivery timeline is shared after order confirmation based on current queue.
Support terms
Complete documentation, setup guide, and viva preparation included. Support for setup and explanation provided.
Download free synopsis (PDF)
Enter your name and email — the synopsis PDF downloads immediately. We may send occasional project updates; no spam, unsubscribe anytime.