
More project photos (2)

Watch it work
The problem
A lift is one of the most familiar machines in daily life, yet its control logic is rarely seen: a button is pressed, a motor runs, a car stops level at a floor, and a display keeps track of where the car is. This project makes that logic visible at tabletop scale. A small car hangs from a cable inside a simple shaft frame, a motor at the top winds the cable, and an Arduino reads two push buttons, drives the motor in the right direction, and updates a seven-segment display with the current floor. The demonstration is easy to challenge in the room: press up and watch the car climb while the number rises, press down and watch it come back while the number falls, and check that the car stops level at its floor.
How it works
The end-to-end mechanism runs from a button press to a level stop. The Arduino reads the up and down push buttons and, on a press, drives the motor in the matching direction. The motor turns a pulley that winds or unwinds the cable, and the cable lifts or lowers the car inside the shaft frame. As the car travels, the firmware updates the seven-segment display, counting up while the car climbs and back down while it descends. When the car reaches its floor, the motor stops and the car rests level, with the display showing that floor.
- The builder assembles the model: the shaft frame, car, motor, pulley, and cable are mounted, and the Arduino, push buttons, and seven-segment display are wired on a prototyping board.
- The builder checks the motor alone: the cable winds and unwinds in both directions, so a wiring or direction error is caught before the display is trusted.
- The builder checks the display alone: the floor number and its counting direction are confirmed, so the display is never confused with another quantity.
- For the upward demonstration, the builder presses up and shows the car climbing while the display counts up, stopping level at the upper floor.
- For the downward demonstration, the builder presses down and shows the car descending while the display counts back down, stopping level at the lower floor.
- For the repeat demonstration, the builder runs the journey again and shows the same stops and display values, proving the behaviour is repeatable rather than a one-off.
- The builder writes up the results honestly, including the model's scale limits, the load it can carry, and every condition under which the car should not be trusted to stop level.
Tech stack:
- Arduino Uno · ATmega328P controller board
- DC motor with pulley and cable · car lift mechanism
- Seven-segment display · current floor display
- Push buttons · up and down direction control
- Shaft frame and car platform · tabletop lift structure
- Prototyping board and jumper wires · control wiring
| Parameter | Value |
|---|---|
| Build type | Tabletop hardware build · shaft frame plus car plus motor plus controller plus display on one bench model (design target) |
| Controller | Arduino Uno · ATmega328P · 5 V logic · USB powered (Datasheet value) |
| Lift mechanism | DC motor at the top of the shaft · pulley and cable · car hangs from the cable (demonstrated) |
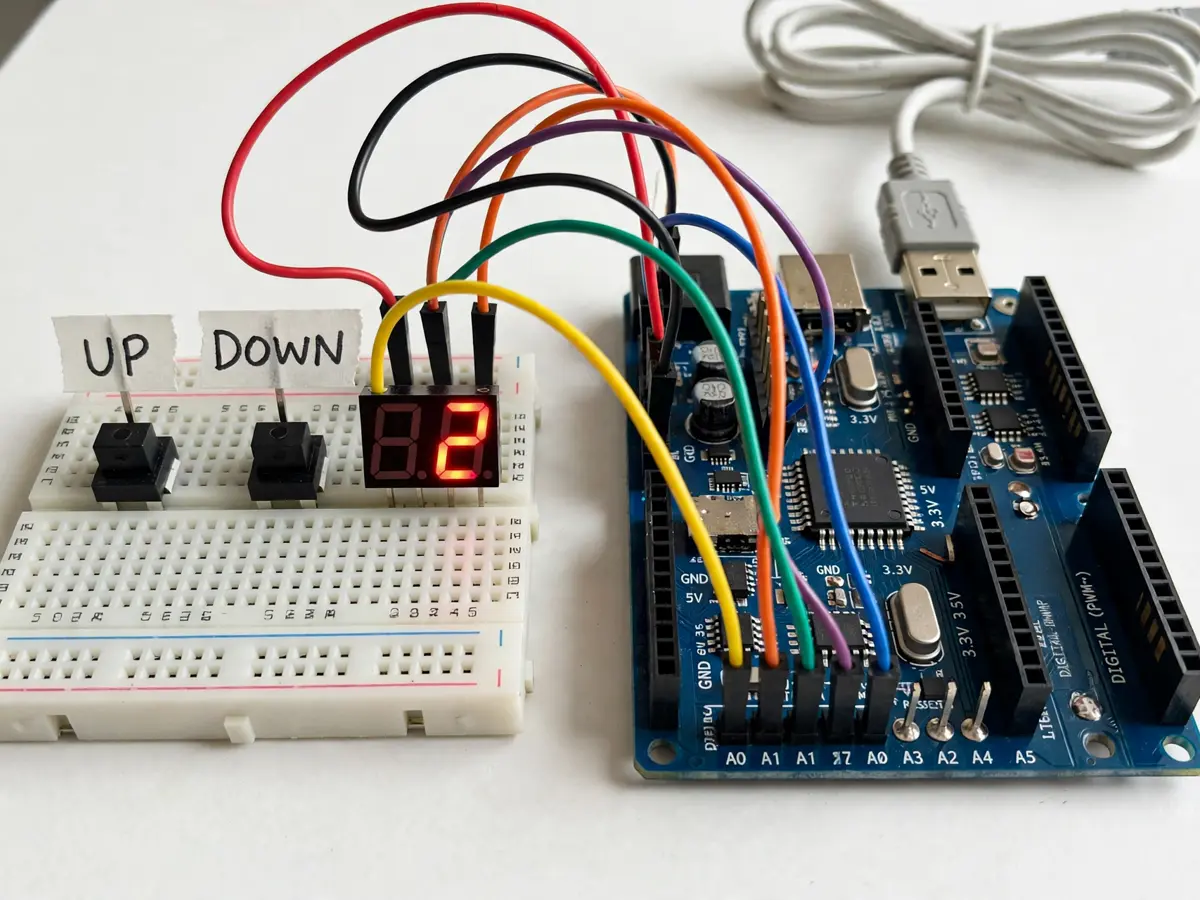
| Direction control | Two push buttons · up and down · pressed to command travel (demonstrated) |
| Floor display | Seven-segment display · shows the current floor · counts up while climbing and back down while descending (demonstrated) |
| Demonstrated floors | Lower floor and upper floors · display shows 2 in the control-panel view and 3 with the car at the top floor (demonstrated) |
| Stopping | Car stops level at its floor · motor stops at the end of travel (demonstrated) |
| Power | Bench supply · open frame · no battery pack in the base build (design target) |
| Doors and floor calls | None in the base build · no automatic doors and no per-floor call buttons · up and down buttons only (design target) |
| Builder note | On the prototype, the car carries only a light model load, and the cable, pulley, and frame are sized for a tabletop demonstration, so the model must not be presented as a passenger lift or a load-carrying machine · noted as a builder observation |
Project features
This model combines a small set of parts into a complete working lift rather than a motor that simply spins. First, the car travels in both directions, so up and down are both demonstrated, not just one. Second, the floor display tracks the car, so the number on the display and the car's position can be checked against each other at any moment. Third, the car stops level at a floor, so the demonstration has a clear pass condition an examiner can judge. Fourth, the whole model runs from a bench supply on an open frame, so the motor, cable, and control board are all visible while it works.
- [Up and down travel] The motor drives the car in both directions on its cable, so the model demonstrates a full lift journey, up and then back down, rather than a single movement — implemented in the base build.
- [Floor display that follows the car] A seven-segment display shows the current floor and counts up as the car climbs and back down as it descends, so the display and the car's position can be checked against each other — implemented in the base build.
- [Push-button control] Two push buttons select the direction of travel, so the demonstration is driven by a deliberate command, not by a fixed loop — implemented in the base build.
- [Level stop at a floor] The car stops at its floor rather than drifting past it, giving the demonstration a clear, checkable result — implemented in the base build.
- [Visible mechanism] The motor, pulley, cable, shaft frame, and control board are all open to view, so the mechanism can be explained while it runs — implemented in the base build.
- [Automatic floor-call queuing and door operation] Future scope only, not implemented: call buttons on each floor, a queue of requested floors, and automatic doors, listed as extensions rather than claimed features, since the base build is a single-car model with up and down buttons only.
What is included
- Complete fabricated tabletop elevator model (shaft frame, car platform, DC motor, pulley, cable, Arduino Uno, push buttons, seven-segment display, prototyping board, jumper wires, bench power lead)
- Control firmware (button reading, motor direction control, floor counting, seven-segment display update, level stop)
- Setup and testing guide (motor-direction check procedure, display check procedure, up-journey demonstration, down-journey demonstration, repeatability worksheet)
- Project report PDF (lift control background, motor and cable design, floor-display logic, demonstration results, honest scale observations)
- PPT presentation for final review
- Viva Q&A preparation document (motor direction control, floor counting, seven-segment driving, level-stop logic, tabletop model versus real lift safety systems)
Limitations & prerequisites
- Tabletop scale only: the model demonstrates lift control logic at bench scale, and its frame, cable, and motor are sized for a light model car, so it must not be presented as a passenger lift or a load-carrying machine.
- No doors and no floor calls: the base build has up and down buttons only, with no automatic doors and no call buttons on each floor, so multi-floor passenger behaviour cannot be shown without the queuing extension.
- No safety systems: a real lift's brakes, overload protection, and emergency systems are not part of this model, and the report states this plainly rather than implying the model is safe for people or loads.
- Light load only: the car carries a small model load, and heavier loads can slow the motor or disturb the level stop, so demonstrations use the intended light car.
- Indoor tabletop use only: the open frame and bench power suit a bench demonstration, and the build is not weatherproofed, battery powered, or designed for outdoor mounting.
- This is an academic prototype, not a certified product: bench electronics need supervision, and the model must not be presented as a safety or industrial lift system.
Frequently Asked Questions
Is this a good choice for a college project?
Yes, for Electronics and IoT programs, because it combines motor control, push-button input, floor counting, and seven-segment display driving, with a demonstration an examiner can challenge on the spot. It gives a clear review thread: how a button press becomes motor direction, how the display tracks the car, why the car must stop level, and where a tabletop model's limits begin.
How does the model know which floor the car is on?
The firmware counts floors as the car travels: it counts up while the car climbs and back down while it descends, and shows the count on the seven-segment display. The display and the car's position can therefore be checked against each other at any moment during the demonstration.
What happens when up is pressed?
The motor winds the cable in the lifting direction, the car climbs inside the shaft frame, and the display counts up. When the car reaches its floor, the motor stops and the car rests level, with the display showing that floor.
What happens when down is pressed?
The motor runs in the opposite direction, unwinding the cable, and the car descends while the display counts back down, stopping level at the lower floor.
Can the car carry a load?
Only a light model load: the frame, cable, and motor are sized for a tabletop demonstration, so heavier loads can slow the motor or disturb the level stop. Demonstrations use the intended light car, and the report states this limit plainly.
Can doors or floor-call buttons be added later?
Yes, as an extension: per-floor call buttons, a queue of requested floors, and automatic doors can be added as separate pieces of work with their own testing. They are listed as future scope because the base build is deliberately a single-car model with up and down buttons only.
Components & software requirements
- Arduino Uno · ATmega328P controller board
- DC motor with pulley and cable · car lift mechanism
- Seven-segment display · current floor display
- Push buttons · up and down direction control
- Shaft frame and car platform · tabletop lift structure
- Prototyping board and jumper wires · control wiring
Delivery information
Built-to-order project. Delivery timeline is shared after order confirmation based on current queue.
Support terms
Complete documentation, setup guide, and viva preparation included. Support for setup and explanation provided.
Download free synopsis (PDF)
Enter your name and WhatsApp number — the synopsis PDF downloads immediately. We may send occasional project updates on WhatsApp; no spam.