
More project photos (2)
The problem
Homes are protected by single-sensor gadgets that cry wolf, or by commercial alarm panels whose wiring logic is a black box. A real intruder panel is a zone machine: every door, window and room is a zone with a sensor, an end-of-line supervision resistor, an arm state and an entry/exit delay — and understanding that machine is exactly the embedded-systems lesson. This project builds a 6-zone panel on an ESP32: reed switches on doors and windows with 2.2 kΩ end-of-line supervision, HC-SR501 PIRs in living spaces, an MQ-2 smoke sensor as a 24-hour always-active zone, a 4x4 keypad for PIN arming with AWAY / STAY / NIGHT modes, a relay-driven siren, battery backup, and a web dashboard showing zone states and a timestamped event log. The system is an educational prototype, not a certified security product.
How it works
- Each reed zone is wired as a normally-closed loop with a 2.2 kΩ end-of-line resistor; the ESP32 reads SECURE / TRIPPED / TAMPER per zone.
- Arming from the keypad starts the 45 s exit delay; the user leaves, and the panel arms in the selected mode.
- On return, opening the entry door starts the 30 s entry delay; the correct PIN disarms before the siren fires.
- Any armed-zone trip outside the delay fires the relay siren and raises a dashboard alarm banner.
- The MQ-2 smoke zone is evaluated continuously in every mode — it never disarms.
- Mains loss switches the panel to battery backup automatically; the dashboard shows the changeover.
- Every event is timestamped into the dashboard log; the daily self-test chirps the siren and polls each zone.
Tech stack:
- ESP32 (Wi-Fi, Arduino C/C++ firmware)
- 4x4 matrix keypad
- HC-SR501 PIR motion sensors
- Reed switches · 2.2 kΩ EOL resistors
- MQ-2 smoke sensor (educational)
- Relay module · 12 V siren
- Rechargeable battery backup pack
- Local web dashboard (HTML/JS)
| Parameter | Value |
|---|---|
| Zones | 6 — 3 reed (doors/windows), 2 PIR (rooms), 1 smoke (24 h) |
| PIR range | HC-SR501, ~7 m class (datasheet) |
| EOL resistor | 2.2 kΩ (design) |
| Entry delay | 30 s (design) |
| Exit delay | 45 s (design) |
| Siren | 110 dB class at 1 m (typical component rating) |
| Battery reserve | ~6 h (design target) |
| Keypad | 4x4 matrix, PIN arming |
Project features
- [Six supervised zones] Reed switches on doors and windows, HC-SR501 PIRs in rooms, and an MQ-2 smoke sensor as a 24-hour always-active zone.
- [End-of-line supervision] 2.2 kΩ EOL resistors let the panel distinguish SECURE / TRIPPED / TAMPER on every wired zone.
- [Keypad PIN arming] A 4x4 keypad arms the panel in AWAY, STAY and NIGHT modes; STAY bypasses interior PIRs, NIGHT arms the perimeter plus selected rooms.
- [Entry/exit delays] 30 s entry and 45 s exit delays (design) so legitimate users never trigger the siren.
- [Relay-driven siren] A 110 dB-class siren fires on any armed-zone trip; a daily self-test chirps it and checks every zone.
- [Battery backup] A rechargeable pack keeps the panel alive through mains outages, with voltage reported on the dashboard.
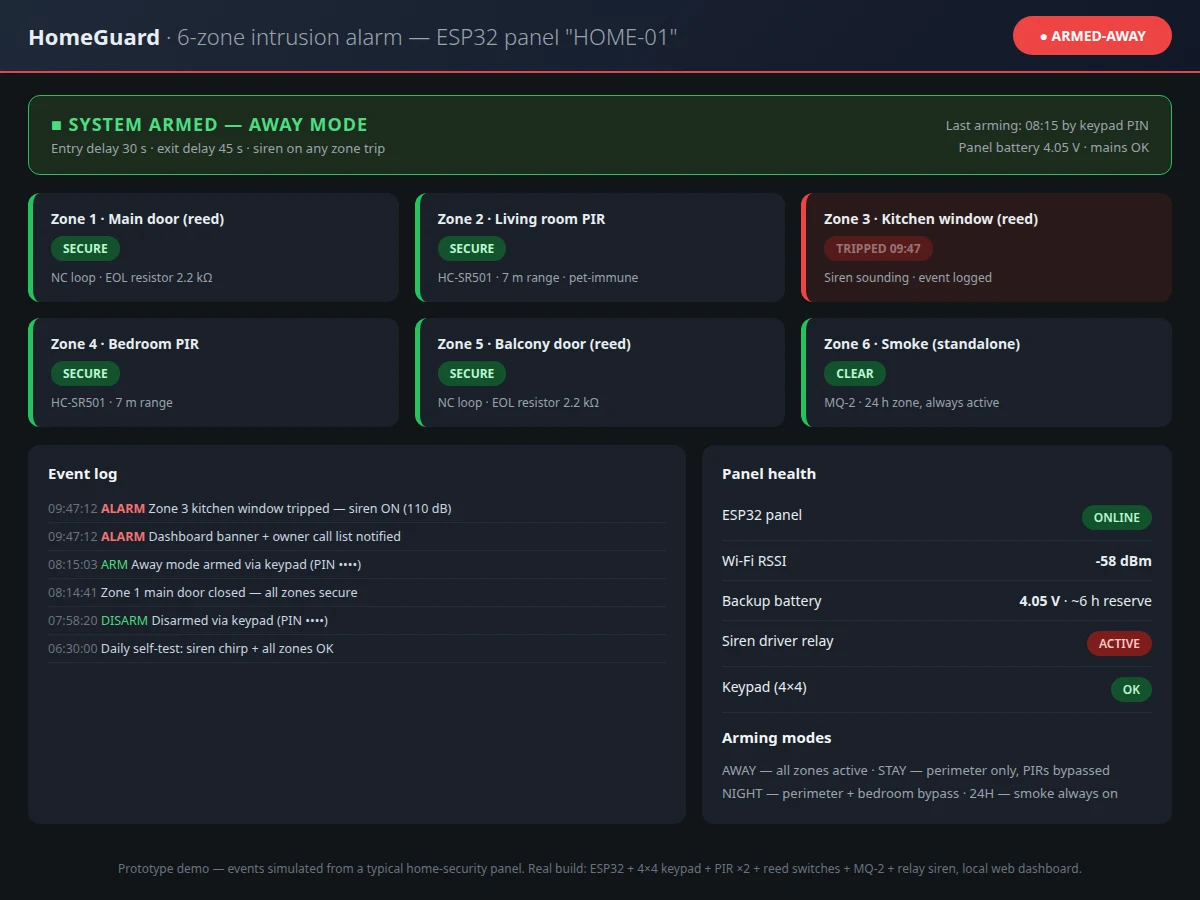
- [Event-log dashboard] Every arm, disarm, trip, delay and self-test is timestamped on the web dashboard, with panel health (RSSI, battery, siren driver) visible.
What is included
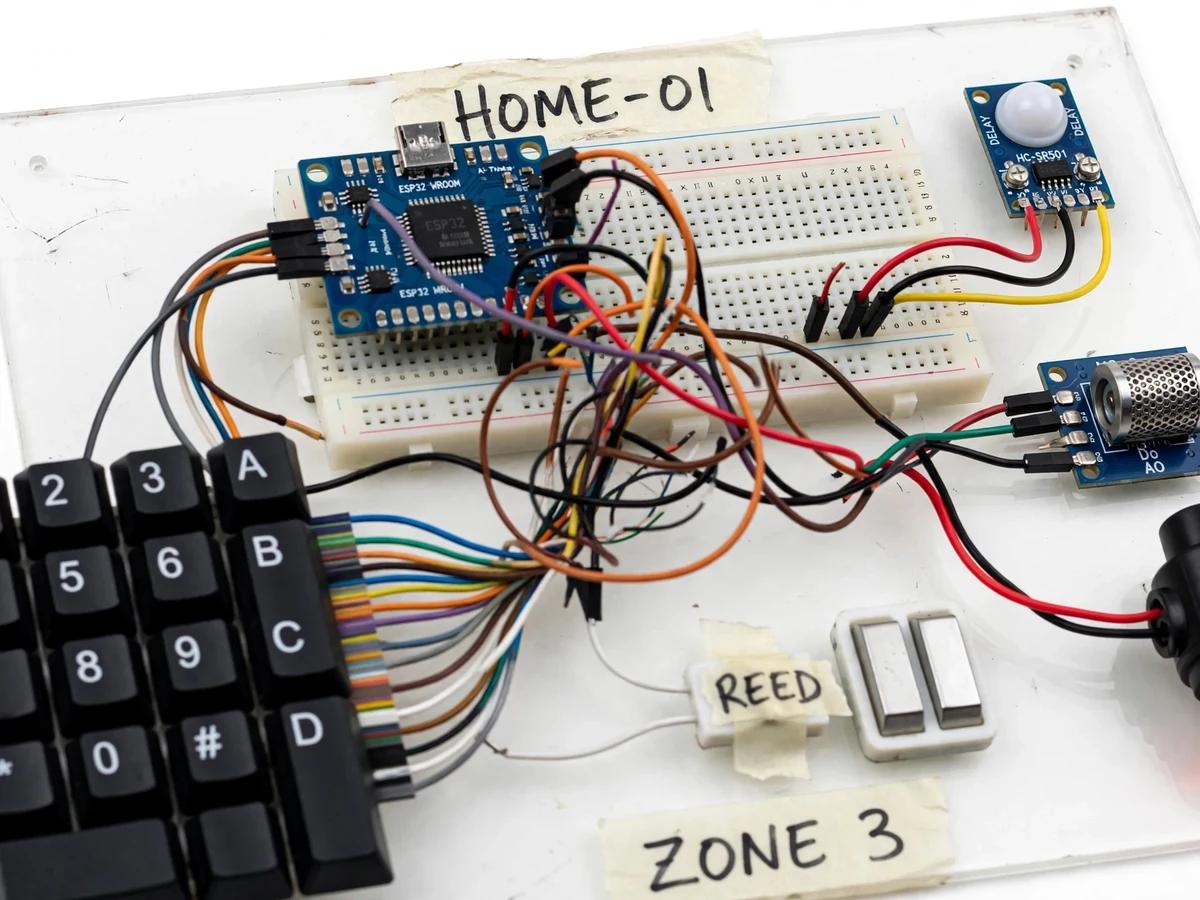
- Working hardware prototype: ESP32, 4x4 keypad, HC-SR501 PIRs, reed switches with EOL resistors, MQ-2, relay module, 12 V siren, battery pack, demo home rig
- Companion web dashboard (zone states, event log, panel health)
- Firmware with zone supervision, arming modes and delay logic
- Wiring diagram and zone-wiring notes
- Project report PDF (alarm-panel theory, zone supervision, sample event logs)
- PPT presentation for final review
- Viva Q&A preparation document
Limitations & prerequisites
- Educational prototype, not a certified burglar-alarm system; it must not be sold or presented as one.
- The MQ-2 is a gas/smoke sensor module, not a certified smoke detector; fire safety still needs certified devices.
- The 110 dB siren figure is a typical component rating, not a measured claim.
- Battery reserve (~6 h) is a design target depending on cell capacity and siren duty cycle.
- No professional monitoring or police-dialer function in this build; GSM alerts are future scope.
- The Wi-Fi dashboard is local-network only.
Frequently Asked Questions
How do the zones stay tamper-proof?
Each wired zone carries a 2.2 kΩ end-of-line resistor, so the panel reads three states, not two: SECURE, TRIPPED, and TAMPER (cut or shorted wire). An intruder shorting the loop to bypass a sensor triggers a tamper state instead of silence — the report explains the resistor math.
What do the three arming modes do?
AWAY arms every zone for an empty house. STAY arms the perimeter but bypasses interior PIRs so people can move inside. NIGHT arms the perimeter plus selected rooms (bedroom bypassed). The keypad selects the mode at arming time.
What happens if I fumble the PIN during the entry delay?
Nothing bad — the 30 s entry delay keeps counting and the keypad accepts retries until it expires. Only an expired delay with no valid PIN fires the siren, and the dashboard logs the whole sequence.
Does the smoke zone work when the panel is disarmed?
Yes. Zone 6 is a 24-hour zone: it is evaluated continuously in every mode, including disarmed. Smoke never waits for arming, so neither does the panel.
How is this different from a GSM intrusion alert box?
A GSM box texts you when one sensor trips. This is a supervised multi-zone panel — keypad PIN arming, three modes, entry/exit delays, EOL tamper supervision and a timestamped event log. The panel architecture itself is the project; remote alerts are future scope.
Is this project suitable for a final-year project?
Yes — for Electronics, Electrical and IoT & Embedded programs. It demonstrates supervised zone wiring, state-machine firmware, event logging and an IoT dashboard on a real alarm-panel architecture. Suitable for B.E./B.Tech final-year projects in Electronics, Electrical and IoT & Embedded Systems.
Components & software requirements
- ESP32 (Wi-Fi, Arduino C/C++ firmware)
- 4x4 matrix keypad
- HC-SR501 PIR motion sensors
- Reed switches · 2.2 kΩ EOL resistors
- MQ-2 smoke sensor (educational)
- Relay module · 12 V siren
- Rechargeable battery backup pack
- Local web dashboard (HTML/JS)
Delivery information
Built-to-order project. Delivery timeline is shared after order confirmation based on current queue.
Support terms
Complete documentation, setup guide, and viva preparation included. Support for setup and explanation provided.