
More project photos (3)
The problem
Commercial 3D bioprinters cost $100,000 or more, so a student who wants to study living materials has no machine to learn on, and the soft shapes a bioprinter makes can collapse before they set. The University of Rochester's Anne S. Meyer lab, reported on 13 November 2026, answered with a $450 conversion of a plastic 3D printer: the filament extruder comes off, a syringe pump goes on, and bio-ink — living cells mixed with a polymer solution — is printed into a support gel slurry that holds it up as it hardens. The Rochester-inspired DIY 3D bioprinter here is the student-scale version of that idea: an Ender-3-class printer, a stepper-driven syringe pump, a 10 mL syringe of alginate ink with baker's yeast, a petri-dish slurry tray, and an ESP32 dashboard logging every layer. The student prints a 20-layer lattice, then a 100-layer hollow cylinder as a design target, and checks yeast viability over 7 days by visible growth.
| This student build | Rochester bioprinter (reported figures) | Stock Ender-3 FDM printer (unmodified) | |
|---|---|---|---|
| What it prints | Living material: alginate gel with baker's yeast, printed into a support slurry | Living materials: engineered gels with bacteria, printed in a support slurry | Solid plastic parts from melted filament (PLA, PETG, TPU) |
| Extruder | Syringe pump: NEMA 17 stepper + T8 lead screw driving a 10 mL syringe | Syringe pump replacing the filament extruder, with extrusion and retraction | Heated brass nozzle extruding melted filament |
| Material | Sodium alginate bio-ink + baker's yeast (BSL-1) in a calcium chloride slurry | Bio-ink of living cells + polymer solution (sodium alginate ink) in a support slurry | Thermoplastic filament, 1.75 mm |
| Tallest structure | 20-layer test lattice, then a 100-layer hollow cylinder (design target) | 100+ layers with hollow cavities (reported) | 250 mm tall in plastic (datasheet build volume) |
| Support during printing | Calcium chloride slurry bath in a petri dish, mixed fresh per print | Support gel slurry, two types: easy-removal and incubation (reported) | None needed — plastic hardens as it cools |
| Cell survival | 7-day viability check by visible yeast growth (student's own observation) | Microbes alive 4+ weeks in the incubation slurry, vs about 9 days before (reported) | Not applicable — no living material |
| Dashboard | BioPrint Console: layer count, extrusion log, flow-rate chart, CSV export | Research device — no dashboard reported | None — printer LCD and slicer only |
| Cost | Conversion parts only; the Rochester lab's reported whole-platform cost is about $450, not this build's price | About $450 for the whole converted platform (reported) | A complete Ender-3-class printer, bought separately |
| Honesty line | Not the Rochester printer; no medical use, no human or animal cells, alginate and yeast only | A laboratory research printer from the Meyer lab | A stock plastic printer, not a bioprinter at all |
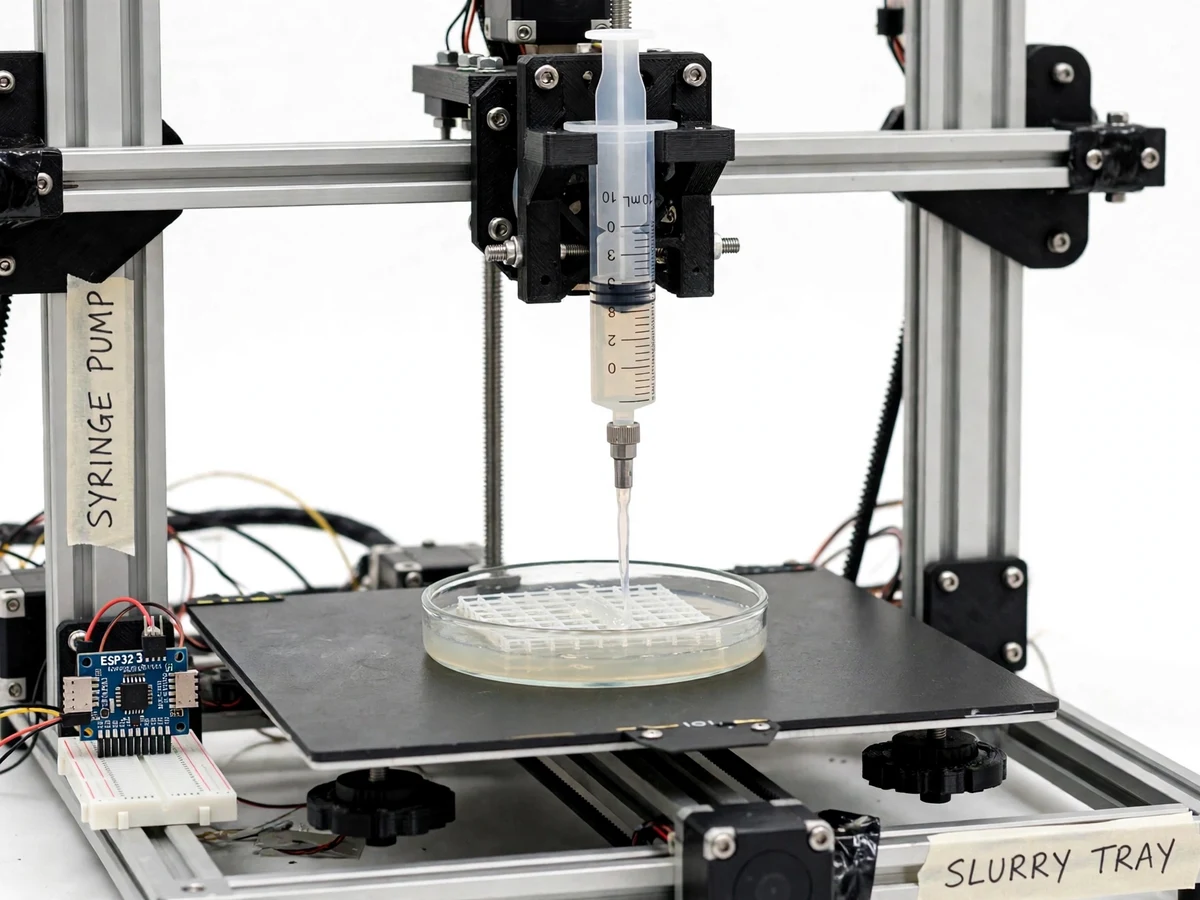
A NEMA 17 stepper turns the T8 lead screw and drives the plunger of a 10 mL syringe.
Follow the working sequence
How it works
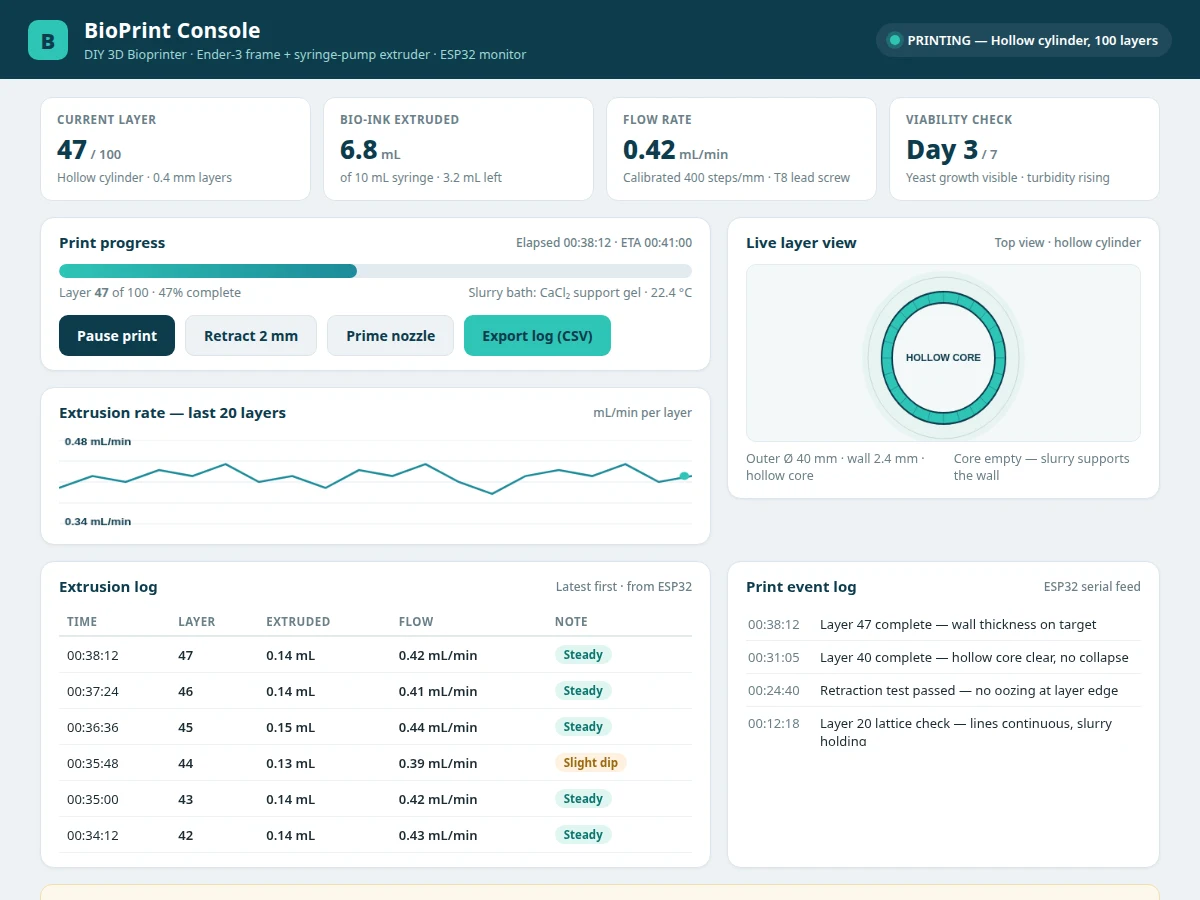
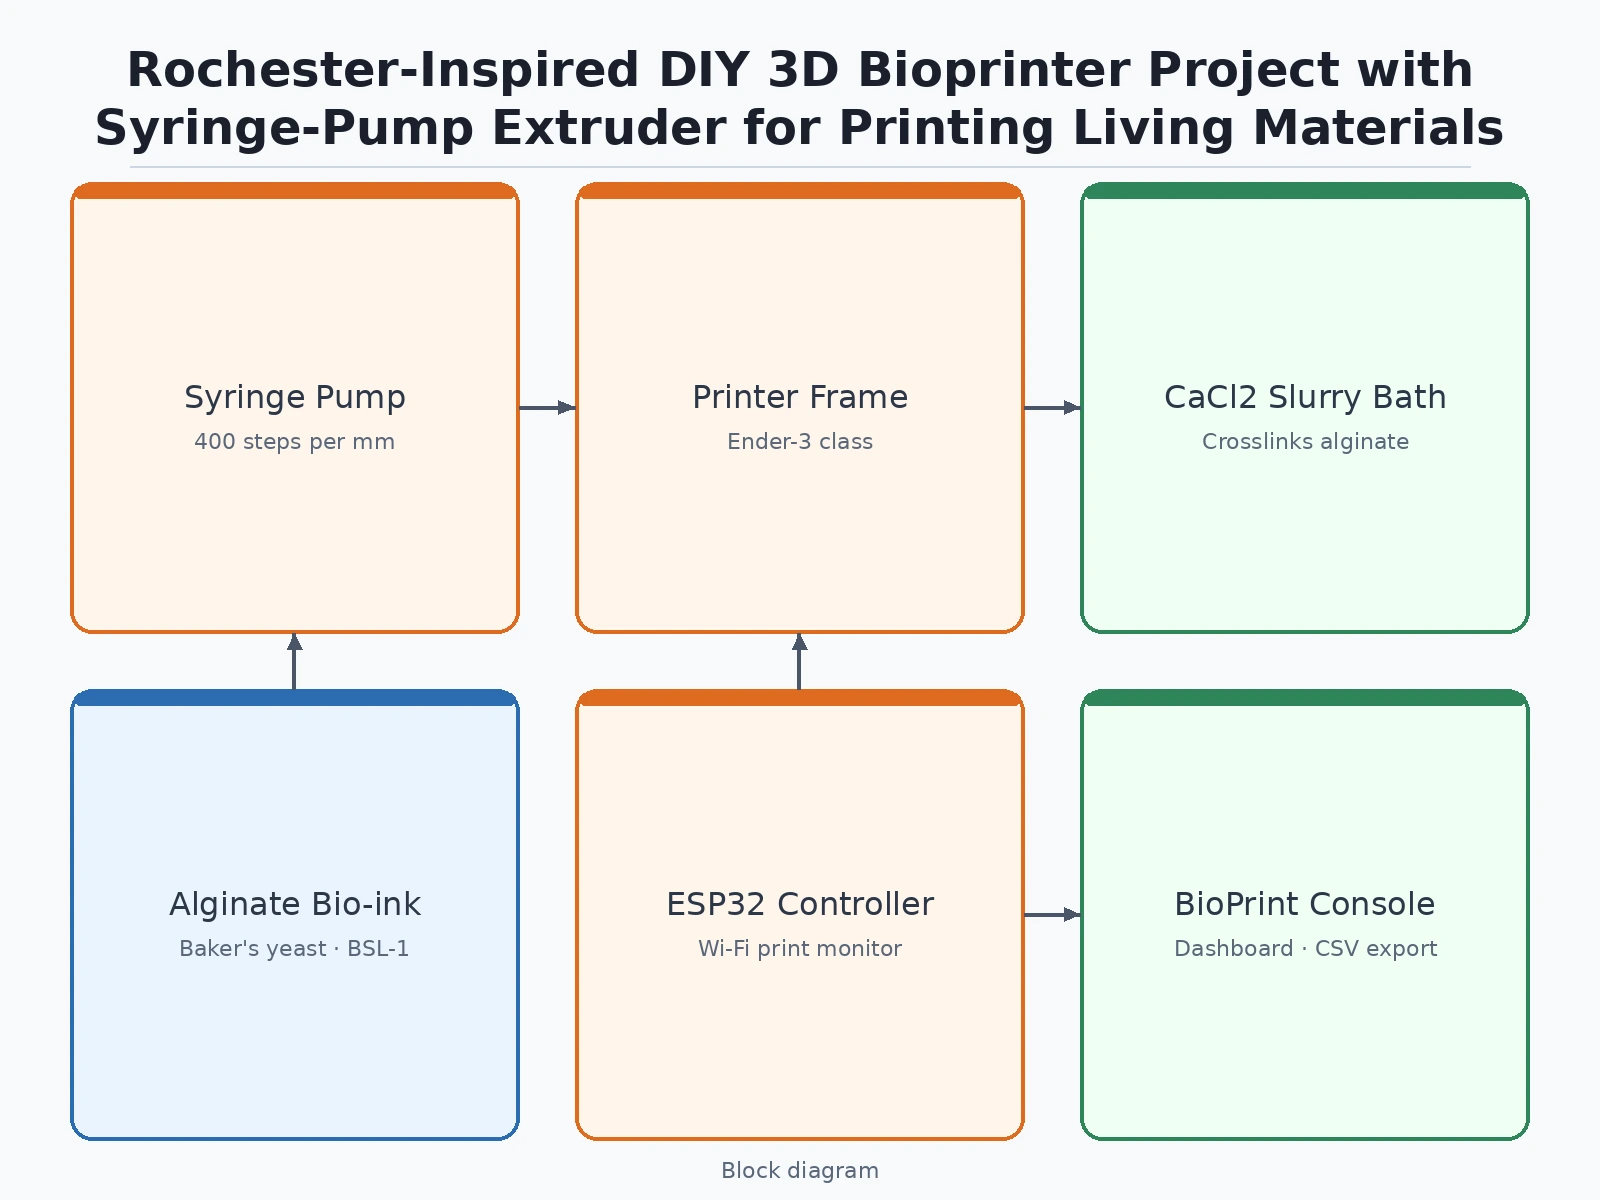
The syringe pump is the heart of the Rochester-inspired DIY 3D bioprinter: a NEMA 17 stepper motor turns a T8 lead screw, the screw pushes the plunger of a 10 mL syringe, and the syringe pushes sodium alginate bio-ink loaded with baker's yeast out of a blunt needle into a petri dish of calcium chloride slurry. The slurry holds each soft line up while the calcium crosslinks the alginate into gel, so the print stands instead of collapsing. The printer's X, Y and Z axes move the needle through the same G-code toolpath a plastic print would use, the ESP32 counts layers and logs every extrusion, and the BioPrint Console draws the layer view, the flow-rate chart and the extrusion log. The student finishes by printing a 20-layer lattice, then a 100-layer hollow cylinder, and watching the print for 7 days to check the yeast is still alive.
- The builder converts the printer: the filament hotend and extruder come off the Ender-3-class frame, and the syringe pump — NEMA 17 stepper, T8 lead screw, 3D-printed bracket and 10 mL syringe — is mounted on the X carriage in its place.
- The builder prepares the slurry tray: a petri dish on the print bed is filled with calcium chloride slurry, mixed fresh for each print, because a stale or thin slurry will not hold a soft gel line upright.
- The builder mixes the bio-ink: sodium alginate solution is mixed with baker's yeast, the syringe is loaded, and the pump is primed until a steady bead of ink appears at the needle — air in the line must be purged, or the first layers starve.
- The builder calibrates the pump: the firmware is set to 400 steps per millimetre (200 steps per revolution at 16× microstepping over an 8 mm lead), then a weigh-and-measure run records the real millilitres per millimetre for the student's own syringe and ink.
- The builder prints the test lattice: a 20-layer lattice is printed into the slurry, the student checks that the lines are continuous and the lattice holds its shape, and any oozing is fixed with a retraction setting.
- The builder prints the hollow cylinder: the 100-layer hollow cylinder runs as the design target, with the ESP32 logging layer count, extrusion volume and flow rate to the BioPrint Console, and the report records how many layers actually held their shape.
- The builder runs the viability check: the finished print sits in its dish for 7 days, the student records visible yeast growth and turbidity each day, and the report states what was actually observed — never a claimed survival time.
Tech stack:
- Ender-3-class FDM printer · syringe-pump conversion
- NEMA 17 stepper · T8 lead screw pump
- Sodium alginate bio-ink · baker's yeast
- Calcium chloride slurry · gel crosslinking
- ESP32 · Wi-Fi print monitor
- Marlin firmware · extruder remap
- HTML · CSS · JavaScript dashboard
- Arduino IDE · ESP32 firmware
How Rochester's bioprinter works — and what this build does instead
- A $450 printer instead of a $100,000 one: A team led by the University of Rochester's Anne S. Meyer, with colleagues from Cornell University, modified a regular plastic 3D printer by removing the plastic filament extruder and replacing it with a syringe pump that squeezes out bio-ink — a formula that mixes living cells with a polymer solution — which hardens into a gel once printed. The work was published in ACS Applied Polymer Materials (Gona et al., DOI 10.1021/acsapm.6c01858) and reported on 13 November 2026. Commercial bioprinters cost upward of $100,000 (reported); the Meyer lab built its version for $450 (reported), with open-source build instructions on GitHub.
- The slurry is what makes tall prints possible: The team developed a support gel called a slurry that the bioprinter prints into, which holds up the bio-ink and helps it solidify quickly and at any height. Two types were created: one for easy removal of the print, and one for incubation that allows microbes in the bioprints to stay alive in the slurry for four or more weeks — in previous methods the printed bacteria started to die after about nine days (reported).
- 100+ layers with hollow cavities: Previous DIY 3D bioprinters were limited to structures of less than 20 layers; the upgraded Rochester printer can print living materials with more than 100 layers and can even create hollow cavities within the prints (reported). The tall, hollow shapes have a high surface-to-volume ratio, so the embedded bacteria can receive nutrients from the environment and excrete useful products more rapidly (reported).
- Retraction stops the oozing: The lab's syringe can perform both extrusion and retraction, preventing oozing at the edges of printed structures, which allows crisp shapes with well-defined edges (reported). The student build copies this: the Marlin firmware drives the pump backwards briefly at each layer change.
- What this build does instead: The student build uses the same conversion idea — syringe pump on a stock printer frame, alginate ink, slurry bath — but at teaching scale and with a safety boundary the lab never needed: baker's yeast only, a BSL-1 organism, never a pathogen, never human or animal cells. The Rochester figures (100+ layers, $450, 4+ weeks) are their results for their printer, labelled as reported; the student build's own numbers are a 20-layer test lattice, a 100-layer hollow cylinder as a design target, and a 7-day viability check by visible growth. This build shares no parts, software or performance with the Rochester printer.
| Parameter | Value |
|---|---|
| Build type | Hybrid bioprinter conversion + ESP32 monitor + web dashboard (design target) |
| Donor printer | Ender-3-class FDM printer · build volume 220 × 220 × 250 mm · 0.4 mm brass nozzle (stock, removed for conversion) · print bed 235 × 235 mm (Datasheet value, Creality Ender-3) |
| Syringe pump | NEMA 17 stepper motor · 1.8° step angle · 200 steps per revolution · 40 N·cm holding torque for the 17HS4417 / 17HS3001-20B class (Datasheet value, RepRap NEMA 17 table) · T8 lead screw · 8 mm lead · 2 mm pitch · 4 starts (component specification) |
| Extrusion calibration | 200 steps/rev × 16 microsteps ÷ 8 mm lead = 400 steps/mm (derived arithmetic) · student weigh-and-measure run records real mL per mm for their own syringe and ink (buyer-run procedure, no result claimed in advance) |
| Syringe | 10 mL plastic syringe with blunt needle · Luer fitting (design target) |
| Bio-ink | Sodium alginate solution + baker's yeast (Saccharomyces cerevisiae, BSL-1) · alginate and yeast only, no pathogens, no human or animal cells (design target) |
| Support slurry | Calcium chloride slurry in a petri dish on the print bed · mixed fresh per print (design target, following the Rochester lab's reported slurry approach) |
| Layer height | 0.4 mm per layer (design target) |
| Validation prints | 20-layer test lattice, then 100-layer hollow cylinder, outer diameter 40 mm, wall 2.4 mm (design target) · report records layers actually held |
| Viability check | 7-day observation · visible yeast growth and turbidity recorded daily (buyer-run procedure, no survival time claimed in advance) |
| Monitor controller | ESP32 · dual-core Xtensa LX6 up to 240 MHz · 520 KB SRAM · Wi-Fi 802.11 b/g/n · Bluetooth 5 LE (Datasheet value) |
| Firmware | Marlin with the extruder axis remapped to the syringe pump · standard G-code drives the pump (design target) |
| Dashboard | BioPrint Console · layer count, bio-ink extruded, flow rate, live layer view, extrusion-rate chart, extrusion log, CSV export (design target) |
| Trend reference | Rochester reported figures only: University of Rochester, Anne S. Meyer lab, with Cornell University · published in ACS Applied Polymer Materials, Gona et al., DOI 10.1021/acsapm.6c01858 · reported 13 November 2026 · about $450 build cost · commercial bioprinters $100,000+ · previous DIY bioprinters under 20 layers · this printer 100+ layers with hollow cavities · two slurry types, incubation slurry keeps microbes alive 4+ weeks vs about 9 days before · syringe performs extrusion and retraction · open-source build instructions on GitHub · shares no parts or method with this build |
| Builder note | Prime the syringe until a steady bead of ink appears at the needle before starting — air trapped in the line compresses under the plunger, and the first 2–3 layers starve while the air squeezes out. The single most common cause of a wavy first layer is an unprimed syringe, not a wrong steps-per-mm value. |
Project features
Seven ideas carry this build. First, a real conversion instead of a simulation: the filament hotend comes off an Ender-3-class printer and a syringe pump goes on, so the student learns how a real machine is repurposed. Second, a pump the student can calibrate: a NEMA 17 stepper and a T8 lead screw give exactly 400 steps per millimetre of plunger travel at 16× microstepping, so extrusion becomes a number, not a guess. Third, a living material that is safe to handle: sodium alginate ink loaded with baker's yeast, a BSL-1 organism, crosslinked in a calcium chloride slurry — no pathogens anywhere in the build. Fourth, a dashboard that explains the print: the BioPrint Console shows layer count, extrusion volume, flow rate and a CSV export of the whole run.
- [Syringe-pump extruder conversion] The filament hotend is removed and replaced with a syringe pump: a NEMA 17 stepper motor turns a T8 lead screw that drives the plunger of a 10 mL syringe, with retraction to stop oozing at layer edges — implemented in the base build.
- [Calibrated extrusion (400 steps/mm)] At 16× microstepping, 200 steps per revolution over an 8 mm lead gives 400 steps per millimetre of plunger travel, and the student runs a weigh-and-measure calibration that records the real millilitres per millimetre for their own syringe and ink — implemented in the base build.
- [Sodium alginate bio-ink with baker's yeast] The bio-ink is sodium alginate mixed with baker's yeast (Saccharomyces cerevisiae, BSL-1), a safe organism for a teaching lab, with no pathogens, no human cells and no animal cells anywhere in the build — implemented in the base build.
- [Calcium chloride support slurry bath] The print happens inside a petri dish of calcium chloride slurry, which holds the soft gel up and crosslinks the alginate into a solid as it is laid down, following the Rochester lab's slurry approach — implemented in the base build.
- [BioPrint Console dashboard] The ESP32 serves a dashboard showing the current layer, bio-ink extruded, flow rate, a live top-view of the hollow cylinder, an extrusion-rate chart and a full extrusion log with CSV export — implemented in the base build.
- [20-layer lattice, then 100-layer cylinder validation] The student first prints a 20-layer test lattice, then attempts the 100-layer hollow cylinder as a design target, and the report records how many layers actually held their shape — a real result from the student's own run, not a claimed layer count — implemented in the base build.
- [7-day yeast viability check] After printing, the student watches the print for 7 days and records visible yeast growth and turbidity, so the report states what the student actually observed about cells staying alive in the gel — implemented in the base build.
- [Marlin firmware with remapped extruder] The printer firmware is Marlin with the extruder axis remapped to the syringe pump, so standard G-code drives the pump and the student learns how firmware maps motion to a new tool — implemented in the base build.
What is included
- Converted Ender-3-class printer prototype (syringe-pump extruder with NEMA 17 stepper and T8 lead screw, 10 mL syringe, slurry tray with petri dish, ESP32 monitor on breadboard)
- Bio-ink kit (sodium alginate, baker's yeast, calcium chloride for the slurry, mixing and safety guide)
- Firmware (Marlin with the extruder remapped to the syringe pump, 400 steps/mm calibration, retraction settings)
- BioPrint Console dashboard (layer count, extrusion volume, flow-rate chart, live layer view, extrusion log, CSV export)
- Setup and calibration guide (conversion steps, slurry mixing, bio-ink preparation, priming, weigh-and-measure calibration, the 20-layer lattice and 100-layer cylinder runs, the 7-day viability check)
- Project report PDF (Rochester background with reported figures labelled as reported, conversion design, pump calibration, slurry chemistry, validation results, honest limits)
- PPT presentation for final review
- Viva Q&A preparation document (how a syringe-pump bioprinter works, alginate crosslinking, steps-per-mm calibration, slurry support, viability checking, limitations)
Work plan & timeline
Total work plan: 100 hours, split across six phases. Phase 1, background study and parts: 14 hours — reading the Rochester coverage and the Ender-3, NEMA 17 and T8 lead-screw specifications, sourcing the donor printer, stepper, lead screw, syringe and ESP32, and printing the pump bracket. Phase 2, hardware build: 22 hours — removing the hotend, mounting the syringe pump on the X carriage, wiring the stepper driver, building the slurry tray and the ESP32 monitor board. Phase 3, firmware and calibration: 22 hours — Marlin extruder remap, 400 steps per millimetre setup, retraction tuning, the weigh-and-measure calibration run, and the priming procedure. Phase 4, bio-ink and slurry: 14 hours — alginate mixing, yeast preparation, calcium chloride slurry mixing, and the first gel-line tests in the dish. Phase 5, validation prints: 16 hours — the 20-layer test lattice, the 100-layer hollow cylinder run, the layer-count record, and the 7-day viability observation. Phase 6, presentation and viva preparation: 12 hours — PPT, demo walkthrough, and the viva Q&A document.
Support
Support covers setup help for the delivered converted printer and firmware, a walkthrough of the syringe pump, the calibration run, the slurry and bio-ink preparation, and the BioPrint Console dashboard, and fixes for defects in the delivered code. Guidance is also provided for adapting the report and presentation to the student's college format and for answering guide questions about bioprinting, alginate crosslinking, syringe-pump calibration, slurry support and viability checking. Support does not cover re-running the 7-day viability check beyond the setup walkthrough, and it does not invent results for prints or observations that were not run.
Limitations & prerequisites
- Not the Rochester printer: this build shares no parts, method or performance with the University of Rochester's bioprinter — it is a student conversion inspired by the reported system, and must never be presented as the Rochester printer or as a reproduction of its results.
- Rochester figures are reported, not this build's: 100+ layers, about $450 and 4+ weeks of microbe survival are the lab's reported figures for their printer; this build's own numbers are a 20-layer test lattice, a 100-layer hollow cylinder as a design target, and a 7-day viability check by visible growth.
- Alginate and yeast only: the bio-ink is sodium alginate with baker's yeast, a BSL-1 organism. No pathogens, no human cells, no animal cells, no medical or clinical use, no transplantable tissue — the build is an academic prototype for student study.
- The 100-layer cylinder is a design target: the report records how many layers actually held their shape, and a failed tall print is a real result to document, not a failure to hide — the Rochester lab's 100+ layers are not a promise for this build.
- Slurry is mixed fresh per print: a stale or thin calcium chloride slurry will not hold a soft gel line upright, and the print collapses — the guide gives the mixing procedure, but the student must run it for every print.
- No accuracy is claimed for the pump before the student's own calibration: the 400 steps per millimetre figure is derived arithmetic, and the real millilitres per millimetre comes only from the student's own weigh-and-measure run.
- Local network only: the BioPrint Console runs over local Wi-Fi from the ESP32; there is no cloud link, so remote monitoring needs a network setup that is an optional extension, not part of the base build.
- Living material handling: the print contains live yeast, so it is handled with basic lab hygiene, kept out of food preparation areas, and disposed of as the college's lab rules require — the build is not food, not medicine, and not a toy.
Frequently Asked Questions
Is this project suitable for a final-year project?
Yes, for IoT, Electronics and Embedded Systems programmes, because it combines a real machine conversion, a calibrated syringe pump, a living material, a support-slurry chemistry and an ESP32 dashboard in one build. The report documents the Rochester background with reported figures labelled as reported, the pump calibration, the slurry method and the validation prints, so the work reads as engineering rather than a copy of a news story.
Is this the Rochester bioprinter?
No — this is a student conversion inspired by the University of Rochester's bioprinter, reported on 13 November 2026, not the Rochester device itself. Their printer is a modified plastic 3D printer with a syringe pump that prints bio-ink into a support slurry, reported at about $450, with 100+ layers and microbes alive 4+ weeks in the incubation slurry. This build uses the same conversion idea at teaching scale with baker's yeast only, and it shares no parts, software or performance with the Rochester printer.
Is it safe to print with living cells?
Yes, because the only organism in this build is baker's yeast, Saccharomyces cerevisiae, a BSL-1 organism used in bread and in teaching labs, handled with basic lab hygiene. The build contains no pathogens, no human cells and no animal cells, and the report states that boundary explicitly. The Rochester lab works with bacteria for wastewater and biofilm research; this student build deliberately does not, because a teaching build must not handle organisms that need containment.
How does the syringe pump control how much bio-ink comes out?
The pump is calibrated, not guessed: a NEMA 17 stepper with 200 steps per revolution, driven at 16× microstepping, turns a T8 lead screw with an 8 mm lead, giving 400 steps per millimetre of plunger travel. The student then runs a weigh-and-measure calibration — extruding a set number of steps and weighing the ink — to record the real millilitres per millimetre for their syringe and ink. That measured figure, not the derived 400 steps per millimetre, is what the report quotes as the pump's extrusion rate.
How do you know the cells are still alive after printing?
The student watches the print for 7 days and records visible yeast growth and turbidity each day, which is the honest observation a teaching build can make without a microbiology lab. The Rochester lab reported microbes alive for 4+ weeks in their incubation slurry, against about 9 days with previous methods, but that is their result for their printer and their slurry. This build claims no survival time in advance — the report states what the student actually saw over their own 7 days.
What will I receive with the project?
You receive the converted Ender-3-class printer with the syringe-pump extruder, 10 mL syringe and slurry tray, the ESP32 monitor board, and the bio-ink kit with sodium alginate, baker's yeast and calcium chloride. The Marlin firmware with the extruder remapped to the pump, the BioPrint Console dashboard with layer count, flow-rate chart and CSV export, the setup and calibration guide, the report, presentation and Q&A document are included too. A donor Ender-3-class printer is the base of the conversion, covered in the setup guide.
Components & software requirements
- Ender-3-class FDM printer · syringe-pump conversion
- NEMA 17 stepper · T8 lead screw pump
- Sodium alginate bio-ink · baker's yeast
- Calcium chloride slurry · gel crosslinking
- ESP32 · Wi-Fi print monitor
- Marlin firmware · extruder remap
- HTML · CSS · JavaScript dashboard
- Arduino IDE · ESP32 firmware
How Rochester's bioprinter works — and what this build does instead
- A $450 printer instead of a $100,000 one: A team led by the University of Rochester's Anne S. Meyer, with colleagues from Cornell University, modified a regular plastic 3D printer by removing the plastic filament extruder and replacing it with a syringe pump that squeezes out bio-ink — a formula that mixes living cells with a polymer solution — which hardens into a gel once printed. The work was published in ACS Applied Polymer Materials (Gona et al., DOI 10.1021/acsapm.6c01858) and reported on 13 November 2026. Commercial bioprinters cost upward of $100,000 (reported); the Meyer lab built its version for $450 (reported), with open-source build instructions on GitHub.
- The slurry is what makes tall prints possible: The team developed a support gel called a slurry that the bioprinter prints into, which holds up the bio-ink and helps it solidify quickly and at any height. Two types were created: one for easy removal of the print, and one for incubation that allows microbes in the bioprints to stay alive in the slurry for four or more weeks — in previous methods the printed bacteria started to die after about nine days (reported).
- 100+ layers with hollow cavities: Previous DIY 3D bioprinters were limited to structures of less than 20 layers; the upgraded Rochester printer can print living materials with more than 100 layers and can even create hollow cavities within the prints (reported). The tall, hollow shapes have a high surface-to-volume ratio, so the embedded bacteria can receive nutrients from the environment and excrete useful products more rapidly (reported).
- Retraction stops the oozing: The lab's syringe can perform both extrusion and retraction, preventing oozing at the edges of printed structures, which allows crisp shapes with well-defined edges (reported). The student build copies this: the Marlin firmware drives the pump backwards briefly at each layer change.
- What this build does instead: The student build uses the same conversion idea — syringe pump on a stock printer frame, alginate ink, slurry bath — but at teaching scale and with a safety boundary the lab never needed: baker's yeast only, a BSL-1 organism, never a pathogen, never human or animal cells. The Rochester figures (100+ layers, $450, 4+ weeks) are their results for their printer, labelled as reported; the student build's own numbers are a 20-layer test lattice, a 100-layer hollow cylinder as a design target, and a 7-day viability check by visible growth. This build shares no parts, software or performance with the Rochester printer.
Delivery information
Built-to-order project. Delivery timeline is shared after order confirmation based on current queue.
Support terms
Complete documentation, setup guide, and viva preparation included. Support for setup and explanation provided.
Download free synopsis (PDF)
Enter your name and WhatsApp number — the synopsis PDF downloads immediately. We may send occasional project updates on WhatsApp; no spam.