
More project photos (3)
The problem
Arduino Electronic Drum Pads with Piezo Sensors and Velocity-Sensitive Sound is a playable electronic drum kit built around an Arduino Uno, four rubber pads and a piezo sensor under each pad. When a drumstick hits a pad, the piezo disc underneath converts the impact into a voltage spike, the Arduino reads that spike, and the DFPlayer Mini sound module plays the matching drum sample through a speaker. The key behaviour is velocity sensitivity: a gentle tap plays a quiet sound and a hard hit plays a loud one, so the kit responds to how the player actually plays rather than just whether a pad was touched. Each pad is assigned its own drum voice, such as kick, snare, hi-hat or tom, so a student can play simple rhythms on a compact board that fits on a bench.
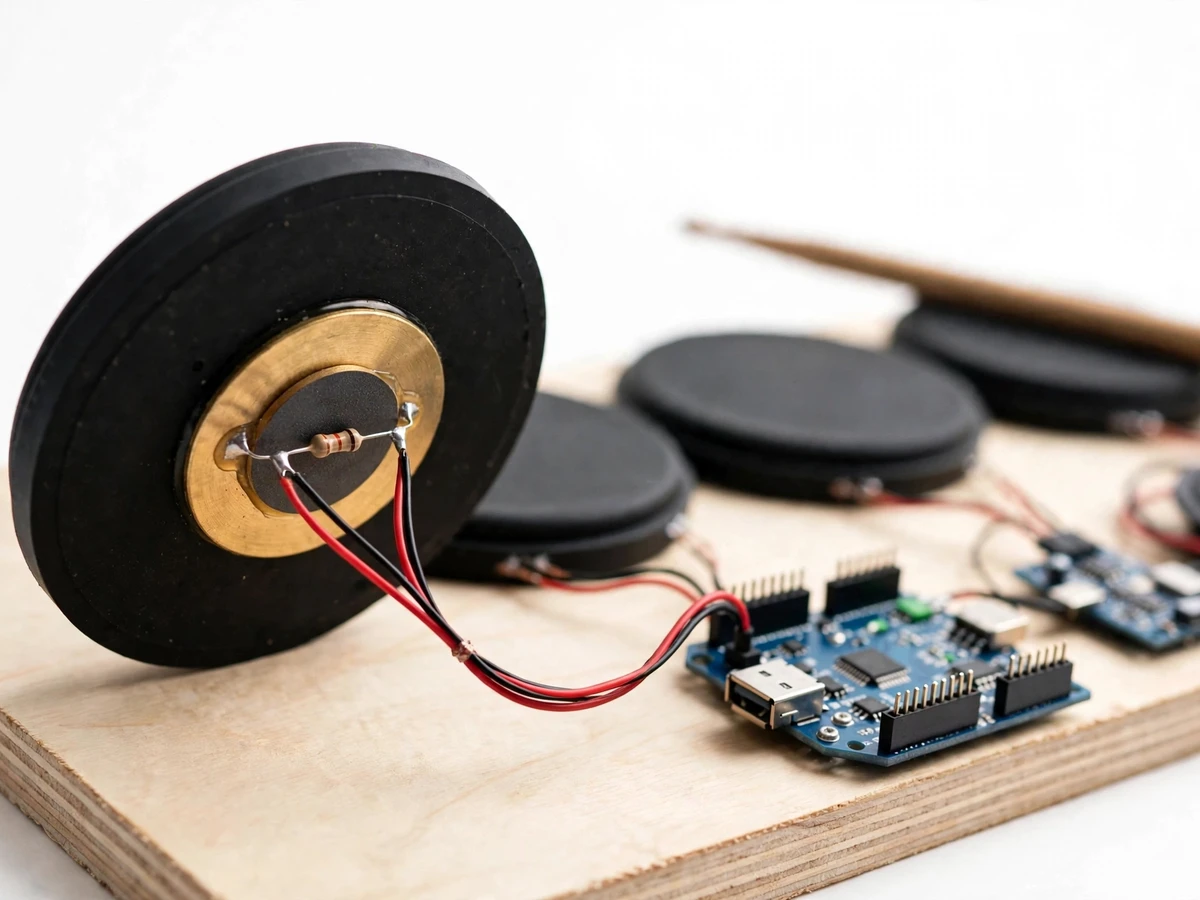
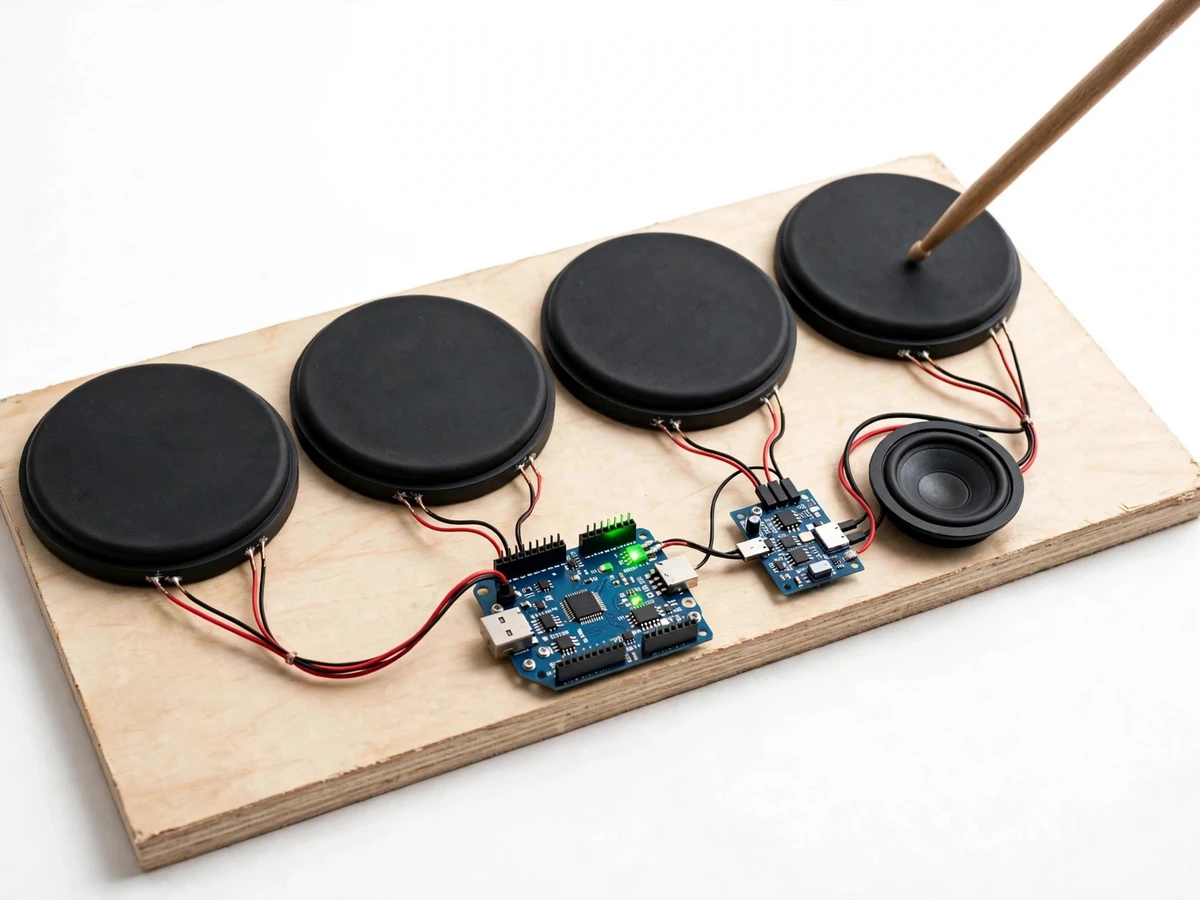
The build is deliberately transparent — every sensor, wire and sample is visible and explainable — which makes it a strong demonstration piece as well as a satisfying instrument to play. The four pads sit in a row on a wooden board beside the Arduino board and speaker, so the whole signal chain is visible at a glance. Power comes from a USB supply, and no computer is needed once the firmware is loaded.
Acoustic drums are loud, bulky and impractical in a hostel room or a laboratory, while commercial electronic kits hide their sensing and sound generation inside sealed hardware that a student cannot open up or explain. A student who wants to understand how electronic drums work therefore has no low-cost build that shows the full chain from impact to sound. This project closes that gap with a bench-sized kit built from ordinary parts: rubber pads on a board, piezo discs as impact sensors, an Arduino as the controller and a small sound module with a speaker. It demonstrates analogue sensing, threshold and peak detection, sample playback and audio amplification in one working instrument, and it gives the student something genuinely playable to demonstrate instead of a silent circuit board.
The player strikes a rubber pad with a drumstick.
Follow the working sequence
How it works
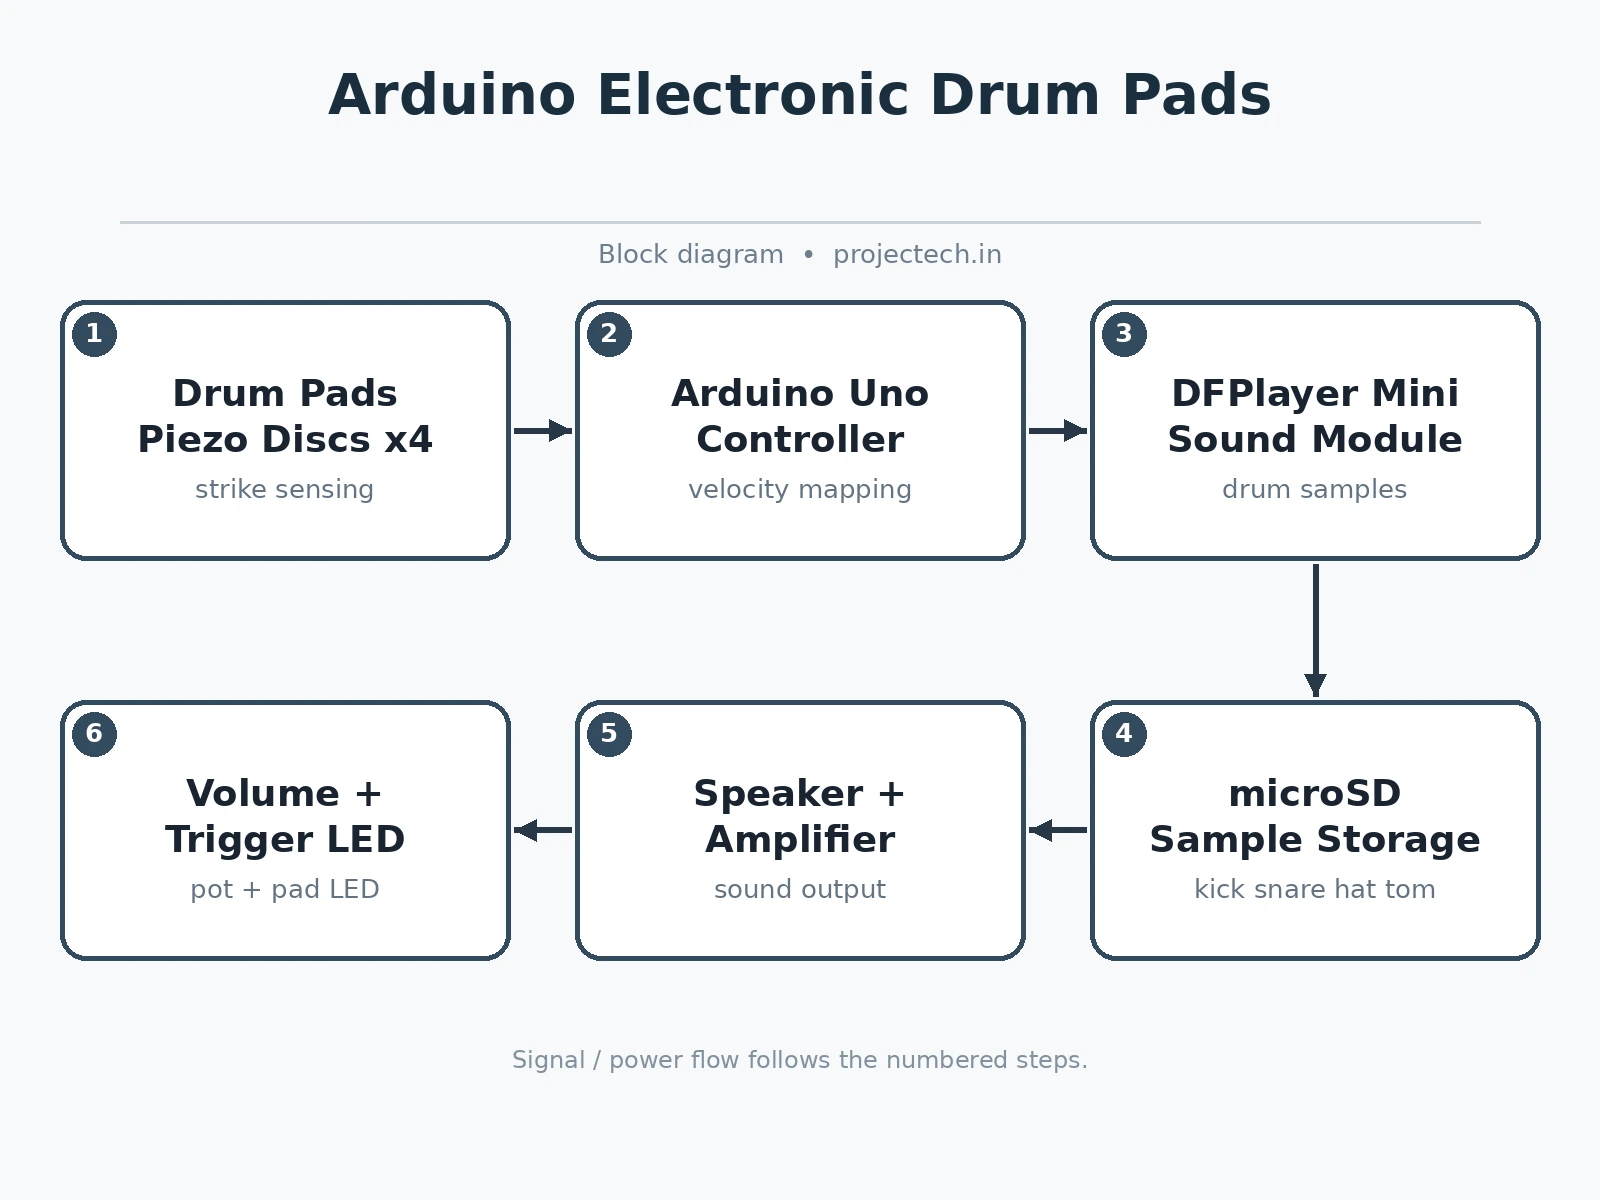
The drum pads work end to end as one sensing-to-sound chain: a drumstick strike bends the piezo disc under a pad, the disc generates a voltage spike proportional to the impact, the Arduino reads that spike on an analogue input, and the firmware converts the peak value into a velocity level that sets how loudly the DFPlayer Mini plays the pad's assigned drum sample through the speaker. A resistor across each piezo disc drains the charge after the strike so the sensor returns to rest instead of ringing on, and a threshold in firmware ignores small vibrations from neighbouring pads so one hit does not trigger two sounds. The whole chain from strike to sound runs in firmware on the Arduino, with no computer in the loop, which keeps the kit responsive and portable. Because each pad has its own analogue input and its own sample, the four voices stay independent even during fast playing.
- The player strikes a rubber pad with a drumstick, and the impact bends the piezo disc fixed beneath the pad.
- The bent piezo crystal generates a voltage spike, with a harder strike producing a higher peak voltage than a soft tap.
- The Arduino reads the spike on the pad's analogue input pin and records the peak value of the strike.
- The firmware compares the peak against a strike threshold set in code, ignoring small vibrations that arrive through the board from neighbouring pads.
- A peak above the threshold is mapped to a velocity level, so the loudness of the coming sound follows the force of the strike.
- The Arduino sends the pad's sample number and the velocity level to the DFPlayer Mini sound module over a serial link.
- The DFPlayer Mini plays the assigned drum sample from the microSD card at the requested volume through the amplifier and speaker, while the pad's LED flashes once.
Builder note from the build: the resistor across each piezo disc is the part that makes the kit playable rather than merely sensitive. Without it, charge lingers on the piezo after a strike and the sensor keeps crossing the threshold, so one hit fires the same drum voice twice or three times. With the resistor fitted, the charge drains within a fraction of a second and the pad is ready for the next strike, which is what lets fast rolls sound like rolls instead of a stutter. The mechanism behind the whole instrument is first-principles and quotable: a piezo crystal generates electric charge when it is deformed, so the harder the drumstick deforms the disc, the larger the voltage the Arduino has to measure.
Tech stack:
- Arduino Uno board
- Piezo disc sensors
- DFPlayer Mini sound module
- Speaker output · amplifier module
- Arduino IDE · C++ firmware
- Rubber drum pads · wooden pad board
- Potentiometer volume control
- microSD sample storage
| Parameter | Value |
|---|---|
| Controller | Arduino Uno board (datasheet value: 10-bit ADC resolution, values 0–1023; operating voltage 5 V) |
| Analogue inputs | 6 analogue input pins (datasheet value), one per pad in the four-pad build |
| Pads | 4 rubber drum pads on a wooden board (design value) |
| Sensors | Piezo disc under each pad (typical datasheet value: disc diameter 27 mm) |
| Bleed resistor | 1 MΩ resistor across each piezo disc (design value) |
| Sound module | DFPlayer Mini module playing MP3 samples from a microSD card (datasheet value: microSD capacity up to 32 GB) |
| Drum voices | 4 voices as default: kick, snare, hi-hat and tom (design value) |
| Output | Small speaker driven through an amplifier stage, with potentiometer volume control |
| Trigger indication | One LED per pad, flashing on a detected strike (design value) |
| Strike-to-sound latency | Under 50 ms (design target, from pad strike to sound onset) |
| Power supply | USB supply for the Arduino board and sound module (design value) |
Project features
The strongest capabilities of these electronic drum pads are velocity-sensitive triggering from piezo impact sensing, four independently assigned drum voices through the DFPlayer Mini sound module, per-pad sensitivity adjustment in firmware, and a compact bench-sized build that plays through a speaker without a computer. Together these give a student a complete sensing-to-sound chain to build, tune and explain: impact becomes voltage at the piezo disc, voltage becomes a velocity value at the Arduino analogue input, and velocity becomes loudness at the speaker. The DFPlayer Mini keeps the drum samples on a microSD card, so changing a drum voice means swapping a sample file rather than rewriting the sound engine. A volume control and a simple trigger indicator keep the kit practical for practice and demonstration, and the whole instrument runs from a USB supply on a bench.
- [Velocity-sensitive triggering — Implemented] Each pad strike produces a piezo voltage spike whose peak the Arduino measures, and the peak value is mapped to a playback volume, so soft taps sound quiet and hard hits sound loud.
- [Four distinct drum voices — Implemented] Each of the four pads triggers its own drum sample from the DFPlayer Mini sound module, with kick, snare, hi-hat and tom assigned as the default four-voice layout.
- [Piezo impact sensing with bleed resistor — Implemented] A piezo disc is fixed under each rubber pad with a resistor across its terminals, which drains the sensor charge after each strike and stops one hit from retriggering as a false second hit.
- [Adjustable sensitivity and threshold — Configurable] The strike threshold and the velocity curve are set in firmware, so a light player can lower the threshold and a heavy hitter can raise it without rewiring anything.
- [Speaker output with volume control — Implemented] The DFPlayer Mini sound module drives a small speaker through an amplifier stage, and a potentiometer sets the overall volume for practice or demonstration.
- [Trigger indication — Implemented] A small LED flashes for the pad that was struck, which makes it easy to check during a demonstration whether a missed sound is a sensing problem or a playback problem.
- [Compact bench build — Implemented] Four pads, the Arduino board, the sound module and the speaker all sit on one wooden board powered from a USB supply, so the kit is portable and needs no computer to play.
Optional customization, developed on request and not part of the base build: additional pads for a larger kit, and a MIDI output for connecting the pads to music software on a computer. Future scope, not included: recording and loop playback of played rhythms, and a foot pedal for a kick trigger.
What is included
- Working prototype: four-pad drum board with Arduino Uno, piezo sensors, DFPlayer Mini sound module, amplifier and speaker
- Arduino firmware source code with strike detection, threshold and velocity mapping, and DFPlayer Mini control
- Drum sample set on microSD card with kick, snare, hi-hat and tom voices
- Circuit and wiring documentation, including piezo mounting and the bleed-resistor detail
- Component list with part numbers for the controller, sensors, sound module and speaker
- Project report PDF (background, piezo sensing theory, methodology, tuning results and analysis)
- PPT presentation for final review
- Viva Q&A preparation document (piezoelectric effect, ADC resolution, velocity mapping, threshold tuning, DFPlayer Mini serial control)
Limitations & prerequisites
- This is an academic prototype instrument, not a commercial electronic drum kit: pad feel, sound quality and durability are at student-prototype level.
- Velocity response depends on pad mounting and piezo placement: a loosely glued disc reads softer than a firmly fixed one, so pads must be tuned individually after assembly.
- Neighbouring pads can pick up vibration through a shared board: the firmware threshold reduces this crosstalk but cannot remove it entirely on a rigid single board.
- The kit plays back recorded samples: it cannot synthesize new drum sounds or change a sample's pitch in the base build.
- Sample quality limits the sound: the output is only as good as the drum samples stored on the microSD card, and a small speaker limits bass response for the kick voice.
- The base build has no recording or MIDI output: those are listed as optional customization or future scope, not included features.
- Outdoor or stage use is out of scope: the wooden board and exposed wiring are built for bench and classroom demonstration.
Frequently Asked Questions
Which controller and sensors are used?
The controller is an Arduino Uno board and the sensor under each pad is a piezo disc, which converts the mechanical impact of a drumstick strike into a voltage spike. The Arduino reads that spike on an analogue input, measures its peak, and uses the peak to set the playback volume, which is what makes the sound velocity-sensitive.
Is this project suitable for a final-year project?
Yes, it fits Electronics and Telecommunication programmes, and it also works for Electrical and Computer Engineering students interested in embedded sensing. It demonstrates piezoelectric sensing, analogue-to-digital conversion, threshold and peak detection, serial communication with a sound module, and audio amplification in one playable instrument. The working drum kit gives the demonstration a clear, audible result to discuss.
How does velocity sensitivity actually work?
A harder strike bends the piezo disc more, which generates a higher voltage peak, and the firmware maps that peak to a louder playback volume. A soft tap therefore plays a quiet sound and a hard hit plays a loud one, with a threshold in firmware ignoring tiny vibrations. The velocity curve and threshold are adjustable in code, so the response can be tuned to light or heavy playing styles.
Does the kit need a computer to play?
No, the kit plays standalone once it is powered from a USB supply, because the Arduino firmware and the DFPlayer Mini sound module handle sensing and playback on the board. A computer is only needed to upload the firmware and to load drum samples onto the microSD card. This keeps the kit portable for bench demonstrations and classroom use.
Can the project be customized?
Yes, within realistic limits: more pads can be added up to the available analogue inputs, drum voices can be changed by swapping sample files on the microSD card, and thresholds can be retuned in firmware. A MIDI output for music software and a foot pedal kick trigger are optional customizations developed on request, while recording and loop playback remain future scope.
What power supply does the prototype need?
The prototype runs from a USB supply, which powers the Arduino board, the sound module and the amplifier stage on the bench. No mains adapter or battery pack is part of the base build, so a demonstration needs a USB port or a USB charger nearby. Battery operation can be added as a customization, but the base kit is designed for bench and classroom use.
Components & software requirements
- Arduino Uno board
- Piezo disc sensors
- DFPlayer Mini sound module
- Speaker output · amplifier module
- Arduino IDE · C++ firmware
- Rubber drum pads · wooden pad board
- Potentiometer volume control
- microSD sample storage
Delivery information
Built-to-order project. Delivery timeline is shared after order confirmation based on current queue.
Support terms
Complete documentation, setup guide, and viva preparation included. Support for setup and explanation provided.
Download free synopsis (PDF)
Enter your name and WhatsApp number — the synopsis PDF downloads immediately. We may send occasional project updates on WhatsApp; no spam.