
More project photos (3)
The problem
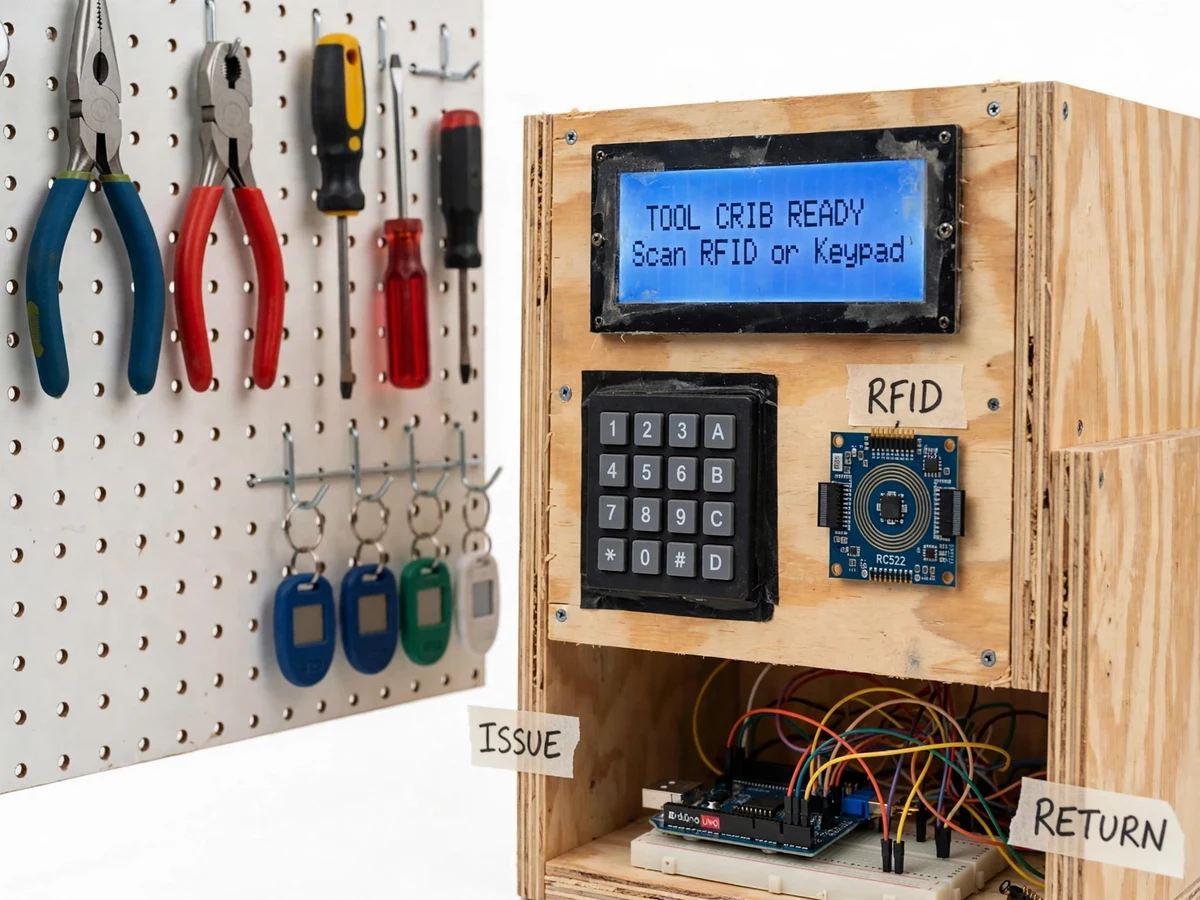
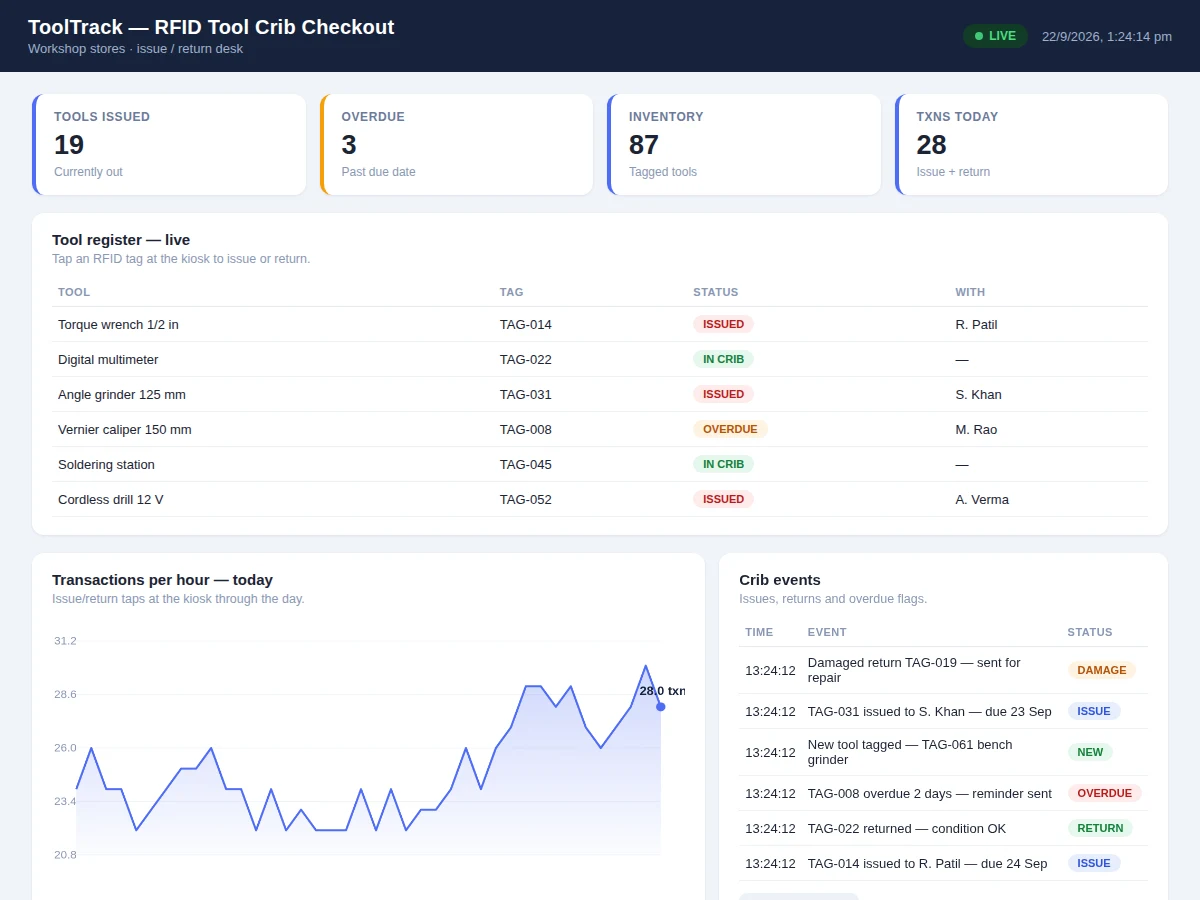
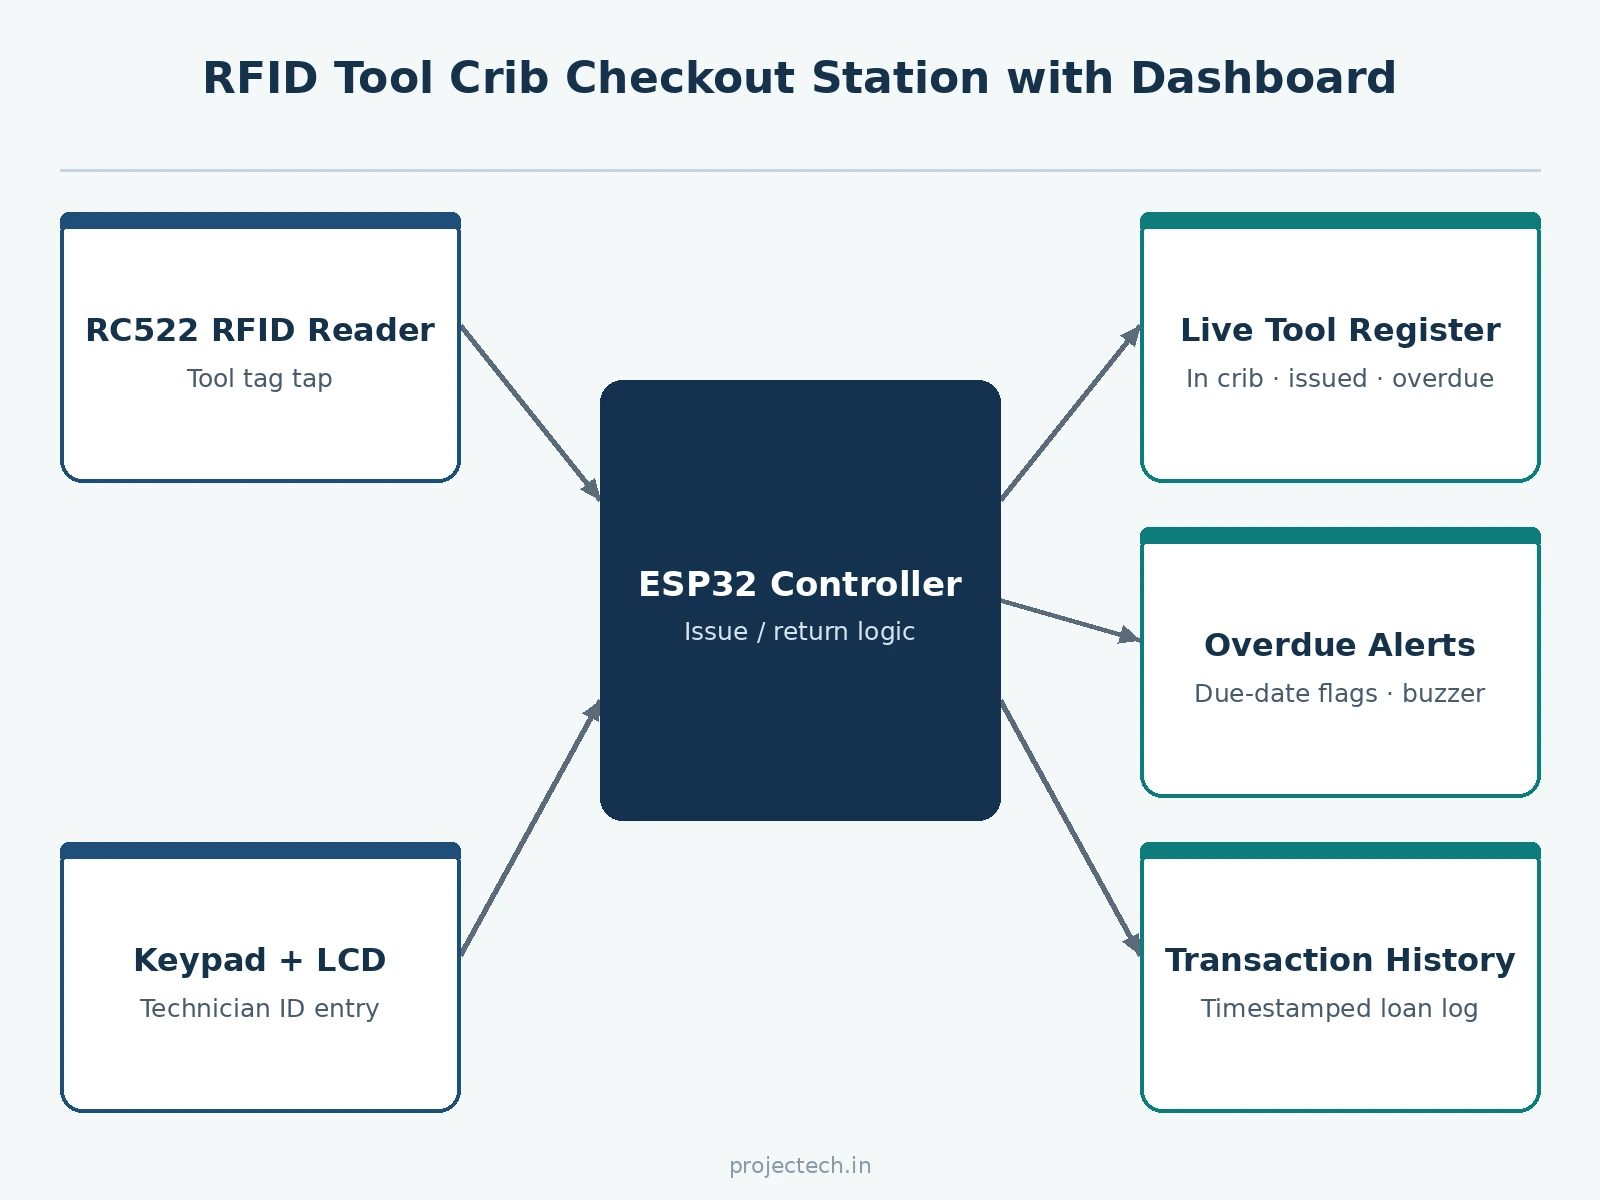
In a shared workshop, tools walk away: borrowed without record, returned to the wrong shelf, or kept for weeks while someone else waits. The paper register, if it exists, is always out of date. The engineering gap is a checkout system with the friction of a tap — RFID tags on the tools, a kiosk that records issue and return in one touch, due dates enforced by the controller, and a dashboard where the storekeeper sees the whole register live. This project builds that on an Arduino/ESP32: an RC522 reader at the kiosk, a keypad and LCD for the transaction flow, tagged tools on a pegboard, and a dashboard with the live register, overdue list and transaction history.
Taps tool tags, enters user ID, issues and returns tools.
Follow the working sequence
How it works
- Each tool carries an RFID tag registered in the controller with its name and tag UID.
- To issue, the technician taps the tool tag, enters their user ID on the keypad, and confirms on the LCD.
- The firmware records the loan with issue time and due date, and the dashboard moves the tool to issued status.
- To return, the tool tag is tapped again; the loan closes and the register shows it back in the crib.
- A background check flags loans past their due date as overdue on the dashboard.
- The storekeeper clears repairs, enrolls new tools and users, and exports the transaction history for the report.
Tech stack:
- Arduino Uno / ESP32 (kiosk controller)
- RC522 RFID reader + tool tags and user cards
- 4x4 membrane keypad + 16x2 LCD (transaction UI)
- Pegboard tool display with tagged hand tools (demo rig)
- Buzzer (feedback beeps)
- Single-page register dashboard (HTML/JS)
- Arduino IDE (C/C++ firmware)
| Parameter | Value |
|---|---|
| Controller | Arduino Uno / ESP32, dashboard sync over serial/Wi-Fi |
| RFID | RC522, 13.56 MHz; tool tags + user cards enrolled in firmware |
| Transaction UI | 4x4 keypad + 16x2 LCD with guided issue/return flow |
| Due dates | Configurable per issue; design default 2 days |
| Register | Live status per tool: in-crib / issued / overdue / repair |
| Demo inventory | Design target 10–15 tagged tools on the pegboard rig |
| Dashboard | Live register, overdue list, transaction history |
| Data | On-device log with timestamps; export for the report |
Project features
- [Tap-to-issue] The technician taps the tool's RFID tag and enters their ID on the keypad; the kiosk logs the issue with a due date in one short flow.
- [Tap-to-return] Tapping a checked-out tool at the kiosk closes the loan; the dashboard marks it back in the crib instantly.
- [Due-date enforcement] Each issue carries a due date; the controller flags overdue loans on the dashboard and can sound a reminder at the kiosk.
- [Live tool register] The dashboard shows every tagged tool, its status (in crib / issued / overdue / repair) and who holds it.
- [User management] Technician IDs are enrolled in firmware; unknown tags are rejected with a clear LCD message.
- [Damage/repair flow] Returns can be marked damaged at the kiosk, moving the tool to repair status until cleared.
- [Transaction history] Every issue, return and overdue event is timestamped for the report's usage analysis.
What is included
- Working tool-crib kiosk prototype (RFID reader, keypad, LCD, controller, tagged tools)
- Pegboard demo rig with hand tools and tags
- Complete firmware source code (enrollment, issue/return flow, due-date engine, dashboard sync)
- Live register dashboard with overdue flags and history
- Circuit and wiring documentation
- Tag-enrollment procedure (buyer-run tool and user registration)
- Project report PDF (inventory-control basics, system design, transaction data from the buyer's run)
- PPT presentation for final review
- Viva Q&A preparation document (RFID, UID management, state machines, inventory logic)
Limitations & prerequisites
- RFID read range is a few centimeters — tags must be tapped at the reader, not read at a distance or through the pegboard in bulk.
- The system tracks what is tapped; a tool taken without tapping is invisible to it — the process still needs the tap discipline.
- User authentication is by enrolled card/tag, not biometrics — cards can be shared, which is a documented process limitation.
- Demo inventory is 10–15 tools; scaling to hundreds needs a database back-end, listed as future scope.
- Due-date defaults are configurable practice values, not any institution's actual policy.
Frequently Asked Questions
How does issuing actually work?
Tap the tool's tag, key in your user ID, confirm on the LCD — the controller logs the loan with a due date. Returning is a single tap of the tool tag.
What happens with overdue tools?
The controller's background check flags loans past their due date; the dashboard lists them with the holder's ID and days overdue.
Can someone issue with another person's card?
Technically yes — the system authenticates the card, not the person. The report documents this honestly as a process limitation, with PIN-on-keypad as a listed hardening option.
Why not just use a barcode scanner?
RFID needs no line of sight and the tap is faster, but the honest answer is both work — RFID was chosen for the tap-and-go flow and UID-per-tool simplicity.
How are new tools added?
An enrollment mode at the kiosk registers a fresh tag with the tool name; the dashboard picks it up immediately.
Is this project suitable for a final-year project?
Yes — for Electronics & Telecommunication, Electrical and IoT & Embedded programs. It is a complete access-and-inventory system with real users, real state and a live dashboard. Suitable for B.E./B.Tech final-year projects in Electronics & Telecommunication, Electrical and IoT & Embedded Systems.
Components & software requirements
- Arduino Uno / ESP32 (kiosk controller)
- RC522 RFID reader + tool tags and user cards
- 4x4 membrane keypad + 16x2 LCD (transaction UI)
- Pegboard tool display with tagged hand tools (demo rig)
- Buzzer (feedback beeps)
- Single-page register dashboard (HTML/JS)
- Arduino IDE (C/C++ firmware)
Delivery information
Built-to-order project. Delivery timeline is shared after order confirmation based on current queue.
Support terms
Complete documentation, setup guide, and viva preparation included. Support for setup and explanation provided.
Download free synopsis (PDF)
Enter your name and WhatsApp number — the synopsis PDF downloads immediately. We may send occasional project updates on WhatsApp; no spam.