
More project photos (2)
The problem
The Desktop Mini Injection Moulding Machine for Plastic Prototyping solves a practical gap in college mechanical labs: students learn injection moulding from diagrams and factory videos, but they never see a melt form, fill a cavity and freeze into a part. The Desktop Mini Injection Moulding Machine for Plastic Prototyping brings that process onto a bench top, using virgin plastic pellets and a small aluminium mould to produce genuine new prototype parts, such as small housings, brackets and test coupons. It is a prototyping machine, not a recycling machine: there is no shredder and no waste-plastic feed, so every shot starts from clean, known virgin material with a known melting behaviour. Without a machine of this scale, moulding stays theoretical, mould design mistakes stay invisible, and students graduate without ever handling the process variables — temperature, pressure, cooling time and clamping — that decide whether a real part comes out complete or short-filled.
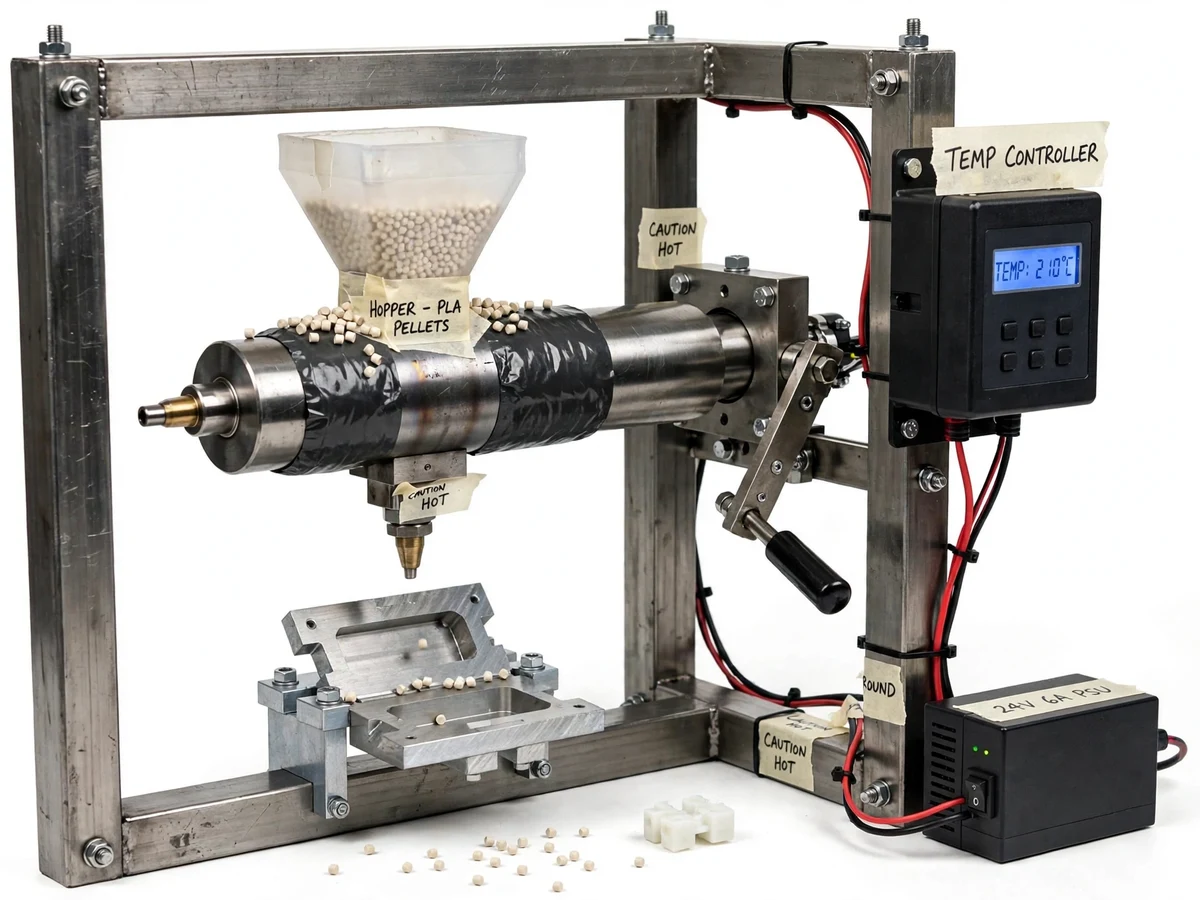
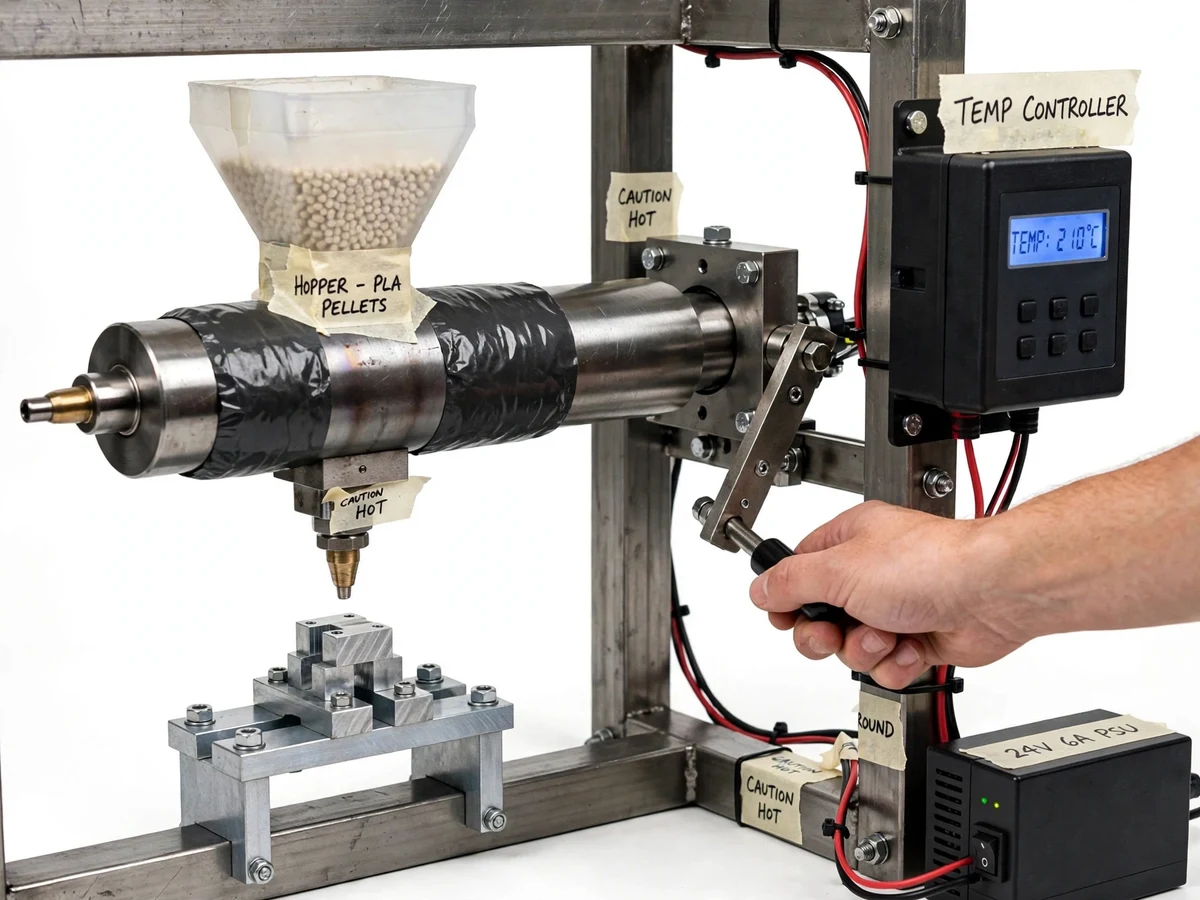
Virgin pellets feed by gravity into the heated barrel.
Follow the working sequence
How it works
The Desktop Mini Injection Moulding Machine for Plastic Prototyping works as a chain from pellet to part: virgin pellets fall from the hopper into a heated barrel, the barrel heaters melt them into a viscous liquid, a lever-driven plunger pushes that melt through a nozzle into a closed aluminium mould, the melt fills the cavity and cools against the mould walls until it is solid, and the mould is then opened so the finished part can be ejected. The Desktop Mini Injection Moulding Machine for Plastic Prototyping keeps every stage in plain sight — the hopper feed, the barrel, the nozzle joint and the mould parting line are all exposed — so an observer can follow the material from solid pellet to solid part. Temperature is the controlling variable throughout: too cool and the melt freezes before the cavity fills, too hot and the material degrades, so the controller holds the barrel at the chosen set point before each shot.
- Virgin plastic pellets are loaded into the hopper and fall by gravity into the heated barrel, where band heaters begin melting them.
- The temperature controller brings the barrel to the set moulding temperature and holds it there, with the thermocouple reading shown on the controller display.
- The mould halves are closed and the clamp frame is bolted shut, sealing the cavity and aligning the sprue bush with the nozzle.
- The operator pulls the injection lever, driving the plunger forward so molten plastic flows through the nozzle and sprue into the mould cavity.
- Injection pressure is held briefly while the melt fills the cavity and starts to cool against the aluminium mould walls.
- After a cooling interval, the clamp is released, the mould halves are opened, and the part is ejected with its sprue and runner still attached.
- The part is inspected for short shots, flash or sink marks, trimmed from its sprue, and the mould is closed again for the next shot.
Builder note (original build detail): the mould must be warm before the first good shot — a cold mould freezes the melt at the gate and produces a short part even when the barrel temperature is correct — so the builder runs one or two purge shots into open air and lets the mould pick up heat before judging any part; and the clamp bolts are tightened in a diagonal sequence, because tightening one side first leaves a gap on the other side and flash appears along one edge of the parting line only.
Tech stack:
- Steel barrel · band heaters · plunger
- PID temperature controller · K-type thermocouple
- Two-plate aluminium mould · bolted clamp frame
- Gravity hopper · virgin plastic pellets
- Hand lever injection drive
- Welded steel bench-top frame
- Nozzle · sprue bush sealing joint
- Mains-powered heater supply · safety switch
| Parameter | Value |
|---|---|
| Machine type | Desktop bench-top injection moulding machine for prototyping (design configuration) |
| Feed material | Virgin plastic pellets only, no waste-plastic or shredded feed (design configuration) |
| Barrel temperature range | 150 °C to 260 °C (design target range, set on the controller) |
| Temperature control | PID controller with K-type thermocouple (design configuration) |
| Shot size | Up to approximately 20 g per shot (design target) |
| Clamp force | Approximately 2 kN from the bolted clamp frame (design target) |
| Injection drive | Hand lever driving a plunger (design configuration) |
| Mould | Two-plate aluminium mould, one cavity in the base build (design configuration) |
| Mould size | Approximately 100 mm × 80 mm × 40 mm per mould half (design target) |
| Frame | Welded steel bench-top frame (design configuration) |
| Machine footprint | Approximately 450 mm × 300 mm × 450 mm (design target) |
| Heater supply | 230 V mains through a switched heater circuit (design input) |
| Heater power | Approximately 500 W total band-heater power (design target) |
| Cycle time | Approximately 3 min to 5 min per shot including cooling (expected, material-dependent) |
| Ventilation requirement | Operation in a ventilated area or under local extraction (safety requirement) |
Project features
The Desktop Mini Injection Moulding Machine for Plastic Prototyping is built around four capabilities that matter most for a working demonstration: a heated barrel that melts virgin pellets to a controlled temperature, a lever-driven injection plunger that pushes the melt into the mould, a clamped two-plate aluminium mould that can be opened to eject a finished part, and a temperature controller that holds the barrel steady shot after shot. Around those four capabilities the build adds practical touches: a hopper that feeds pellets by gravity into the barrel, a nozzle that seals against the mould sprue so melt does not leak at the joint, and a bench-top steel frame that keeps barrel, nozzle and mould aligned. Together these capabilities turn a textbook process into a part a student can hold: pellets go in, a lever stroke fills the mould, and after cooling the mould opens onto a real prototype part with visible sprue, runner and cavity detail.
- [Heated barrel with temperature control] Band heaters around a steel barrel melt virgin pellets to the set temperature, and a PID temperature controller with a thermocouple holds that temperature steady, so the melt viscosity stays consistent from shot to shot.
- [Lever-driven injection plunger] A hand lever drives a plunger down the barrel, pushing molten plastic through the nozzle into the mould cavity; the operator controls the stroke speed and can hold pressure briefly while the part starts to cool.
- [Two-plate aluminium mould with clamp] A small two-plate aluminium mould is held shut by a bolted clamp frame during injection and opened by hand after cooling, so the part and its sprue can be removed and inspected directly.
- [Gravity hopper feed] A hopper above the barrel feeds virgin pellets by gravity into the heated zone, keeping the feed simple, visible and easy to change between pellet types for demonstration.
- [Nozzle-to-mould seal] The barrel nozzle seats directly against the mould sprue bush, so the melt path from barrel to cavity is short and sealed, reducing leakage and wasted material at the joint.
- [Bench-top steel frame] A welded steel frame holds the barrel, nozzle and mould clamp in fixed alignment on a bench top, so the machine can be carried into a lab, demonstrated, and stored without re-alignment.
- [Visible, inspectable parts] Every shot produces a part with a sprue and runner attached, giving the student physical evidence of filling, cooling and ejection to discuss, measure and photograph for the report.
Optional customization (not in the base build): a second interchangeable mould cavity for a different part shape, and a screw-type plunger feed in place of the gravity hopper. Future scope (not implemented): a motorised injection drive with pressure logging, and a heated mould plate for temperature-sensitive materials.
What is included
- Assembled desktop mini injection moulding machine: frame, heated barrel, hopper, plunger and lever, nozzle, clamp frame and one two-plate aluminium mould
- Temperature controller unit with thermocouple, wired and tested for heater control
- Virgin pellet starter pack for demonstration shots
- Mould drawings and assembly documentation with the purge-shot and diagonal clamp-tightening procedure
- Operating and safety guide covering hot surfaces, pressure, ventilation and shutdown
- Project report PDF (moulding process theory, machine design, mould design, procedure, honest limits)
- PPT presentation for final review
- Viva Q&A preparation document (melting, injection pressure, mould filling, cooling, defects and their causes)
Limitations & prerequisites
- The machine moulds small prototype parts only: the shot size is capped at approximately 20 g (design target), so large housings and multi-cavity production parts are out of scope.
- HOT SURFACE HAZARD: the barrel, band heaters and nozzle run at up to 260 °C (design target maximum) and stay hot after switch-off; the nozzle and barrel must never be touched during or immediately after a run, and heat-resistant gloves are required for mould handling.
- PRESSURE HAZARD: the melt is injected under lever pressure and the mould clamp must be fully bolted before every shot; an unclamped or partly clamped mould can leak hot melt at the parting line.
- VENTILATION REQUIRED: heated plastic can release fumes, so the machine must run in a ventilated area or under local extraction, and it must never be run in a closed, unventilated room.
- Part quality is prototype-grade, not production-grade: surface finish, dimensional repeatability and cycle time do not match a factory machine, and the report states this openly.
- Only virgin pellets of grades suited to the stated temperature range are supported in the base build; filled, reinforced or high-temperature engineering resins are out of scope without a mould and heater review.
- The prototype is a college-lab demonstration machine, not a certified industrial moulding machine, and it must not be used for commercial production or for parts that carry safety loads.
Timeline
- Week 1: frame and barrel — steel frame welded and aligned, barrel and plunger machined, band heaters and thermocouple fitted.
- Week 2: mould and clamp — two-plate aluminium mould machined, sprue bush fitted, clamp frame assembled, nozzle-to-mould alignment checked.
- Week 3: controls and first shots — temperature controller wired and tuned, purge shots run, mould warm-up procedure established, first parts inspected for short shots and flash.
- Week 4: documentation and viva preparation — mould drawings finalised, report completed, PPT and Q&A document prepared, machine demonstrated end to end from pellets to ejected part.
Support
- Setup guidance covers bench placement, ventilation, mains connection, controller set-point selection for the pellet grade, and the pre-run safety check of clamp bolts and nozzle seating.
- Demonstration support covers the full shot sequence — pellet loading, heat soak, clamp, injection, cooling and ejection — and how to explain short shots, flash and sink marks honestly in a viva.
- Fault guidance covers the common build faults: a cold mould giving short parts, clamp bolts tightened on one side only giving edge flash, and a nozzle that is not seated giving melt leakage at the sprue.
Frequently Asked Questions
How is this different from a manual plastic recycling machine?
This machine is built for prototyping new parts from virgin pellets, not for recycling waste plastic. It has no shredder and no waste feed: clean virgin pellets go into the hopper, melt in the heated barrel, and are injected into a small aluminium mould to form a new part. A manual recycling machine instead reprocesses collected waste plastic, which brings contamination, mixed grades and inconsistent melting. The two builds answer different questions, use different feedstock, and produce different parts.
What plastic can it mould?
The base build moulds virgin pellet grades suited to its stated temperature range, demonstrated with a common commodity pellet grade supplied in the starter pack. The temperature controller is set to the grade being moulded, and the report records the set point used for the demonstration parts. Grades outside the stated range, filled or reinforced grades, and high-temperature engineering resins are out of scope for the base build, because they need a mould and heater review before they can be run safely.
How does the temperature controller work?
The controller reads the barrel temperature from a thermocouple and switches the band heaters to hold the set point. The operator dials in the moulding temperature for the pellet grade, waits for the display to settle at that set point, and only then runs a shot. Holding temperature steady matters because melt viscosity changes with temperature: too cool a melt freezes before the cavity fills, while too hot a melt degrades and discolours. The report explains the set point chosen for the demonstration grade.
What will the moulded parts look like?
Each shot produces a small prototype part with its sprue and runner still attached, exactly as a factory moulding leaves the mould before trimming. The part is removed from the opened mould, inspected for defects such as short shots, flash along the parting line, or sink marks, and then trimmed from its sprue. Early shots on a cold mould may come out short, which is expected and is used in the report as evidence of the warm-up procedure rather than hidden.
Is it safe to run in a college lab?
It is safe to run under the stated precautions, and those precautions are part of the demonstration, not an afterthought. The barrel and nozzle run hot enough to burn, so they are never touched during a run and mould handling uses heat-resistant gloves. The mould clamp is fully bolted before every shot, because hot melt can leak from a partly clamped mould. The machine runs only in a ventilated area or under local extraction, since heated plastic can release fumes.
Is this project suitable for a final-year project?
Yes — for Mechanical engineering degree and diploma programmes, because it combines manufacturing process theory with a working machine: melting and heat transfer, injection pressure, mould design, clamping, cooling and defect analysis in one bench-top build. It gives a live demonstration from pellets to a finished part, and its honest limits — small shot size, prototype-grade finish and strict safety precautions — make for strong viva discussion.
Components & software requirements
- Steel barrel · band heaters · plunger
- PID temperature controller · K-type thermocouple
- Two-plate aluminium mould · bolted clamp frame
- Gravity hopper · virgin plastic pellets
- Hand lever injection drive
- Welded steel bench-top frame
- Nozzle · sprue bush sealing joint
- Mains-powered heater supply · safety switch
Delivery information
Built-to-order project. Delivery timeline is shared after order confirmation based on current queue.
Support terms
Complete documentation, setup guide, and viva preparation included. Support for setup and explanation provided.
Download free synopsis (PDF)
Enter your name and WhatsApp number — the synopsis PDF downloads immediately. We may send occasional project updates on WhatsApp; no spam.