
More project photos (2)
The problem
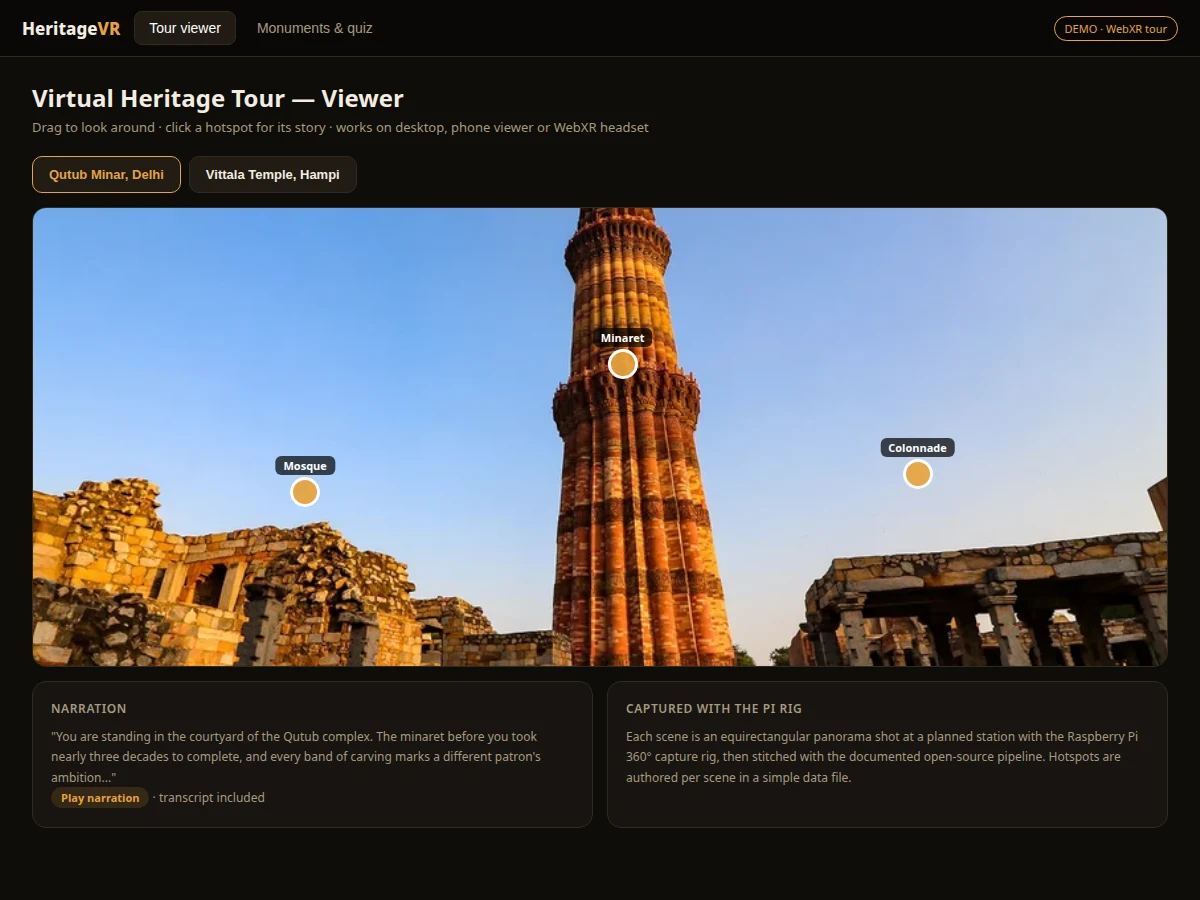
Heritage monuments are fragile, distant and often inaccessible: travel costs, crowds and conservation closures keep most students from ever studying them on site. Photographs flatten them and video locks the viewer to the cameraperson's path. A 360° virtual tour fixes both — the viewer looks wherever they want — but commercial capture services are expensive and closed. This project builds the open, student-scale version: a Raspberry Pi 360° capture rig (Pi, camera modules, tripod mount) that the buyer uses to photograph a monument as overlapping panoramas, plus a WebXR tour web app where those panoramas become explorable scenes. Hotspots mark carved pillars, inscriptions and courtyards with info cards; a narration track and timeline tell the monument's story; a quiz checks what the visitor learned. Because the whole pipeline — capture, stitch, tour — is built by the student, the report documents a genuine content-production workflow, and the viva can go deep on panoramic imaging and WebXR.
How it works
- The buyer plans capture stations around the monument (courtyard, entrance, sanctum approach) and mounts the Pi rig on the tripod at each station.
- The capture script rotates through the camera modules (or triggers the 360 camera), shooting overlapping frames with fixed exposure per station.
- Frames are transferred to a PC and stitched into equirectangular panoramas with the documented open-source pipeline; the guide covers alignment failures and re-shoots.
- Panoramas are dropped into the tour app's scenes folder; the buyer authors hotspots (position, title, text, image) in a simple data file per scene.
- The WebXR viewer renders each panorama as an inside-out sphere; hotspots are positioned by yaw/pitch and open info cards on click or gaze.
- Narration text and the timeline are authored alongside; the quiz pulls its questions from the same content file so everything stays consistent.
- The finished tour is a static web app — hostable anywhere — viewable on desktop, phone-with-viewer, or a WebXR headset.
Tech stack:
- Raspberry Pi (any recent model) + camera module(s) or 360 camera + tripod mount
- Python capture script (timed/bracketed shooting, station logging)
- Open-source panorama stitching pipeline (documented step-by-step)
- WebXR / three.js-based 360° tour web app (single deployable app)
- Hotspot/narration/quiz content as editable data files
- Cardboard-style phone viewer compatible (no dedicated headset required)
| Parameter | Value |
|---|---|
| Capture rig | Raspberry Pi + camera module(s)/360 camera, tripod mount, battery power |
| Panorama output | Equirectangular 360° x 180° per station (resolution depends on camera used) |
| Viewer | WebXR 360° viewer; desktop drag-look, phone Cardboard-style, WebXR headsets |
| Hotspots | Yaw/pitch-positioned info cards with text + images, authored per scene |
| Narration | Per-scene script with text transcript; buyer-authored |
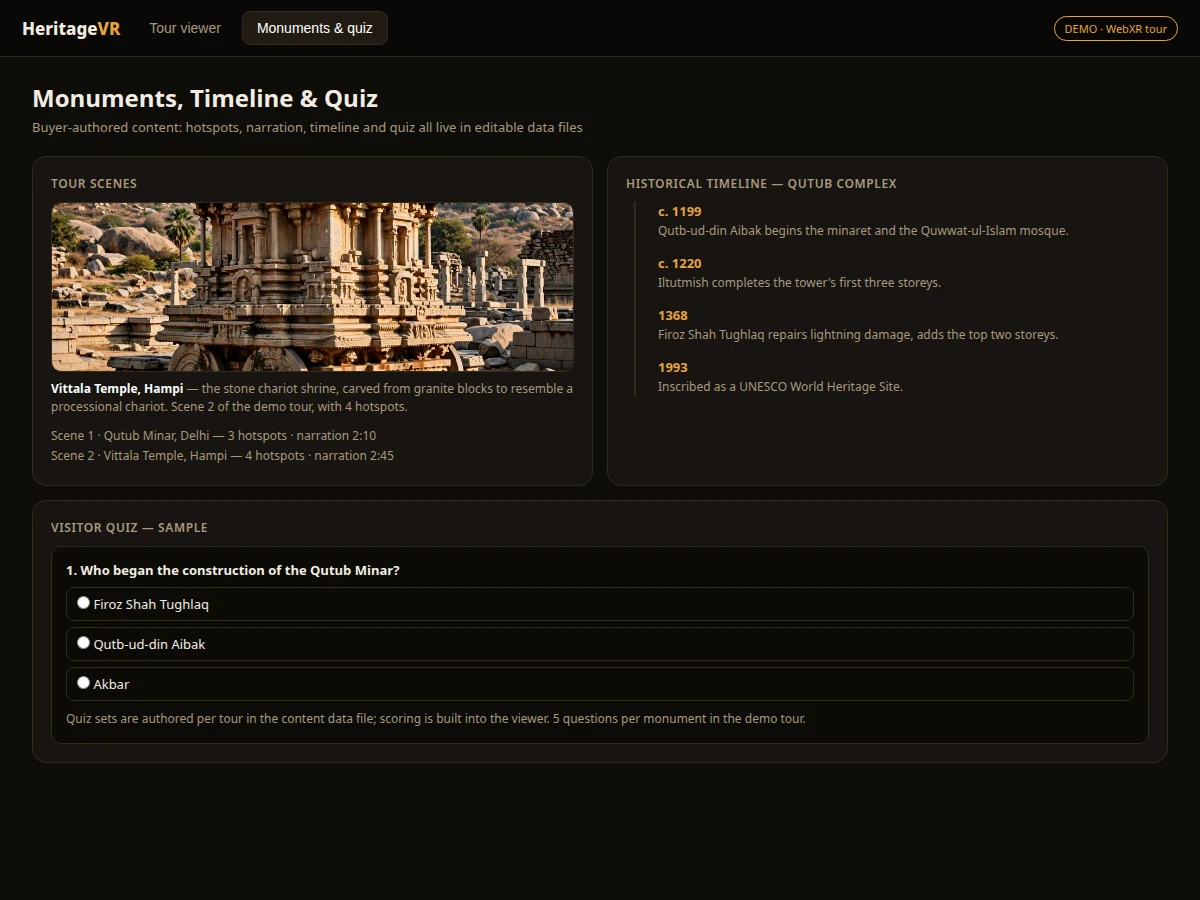
| Timeline | Monument history phases linked to scenes |
| Quiz | Per-tour question set with scoring (typically 5 questions) |
| Deployment | Static web app — any web host; no server code required |
| Content | Buyer captures and authors their own monument; sample demo scenes included |
Project features
- [360° capture rig] Raspberry Pi with dual camera modules (or a 360 camera) on a tripod mount; a capture script shoots bracketed, overlapping panoramas at each marked station.
- [Panorama stitching workflow] Documented open-source stitching pipeline turning each station's shots into one equirectangular panorama, with exposure blending notes.
- [WebXR tour viewer] Explorable 360° scenes with drag look-around on desktop and head-tracked view in a Cardboard-style phone viewer or WebXR headset.
- [Clickable hotspots] Info cards pinned to architectural features — pillars, inscriptions, doorways — with text and images the buyer authors per monument.
- [Narration track] Per-scene audio-style narration with text transcript; the buyer records or writes their own script from research.
- [Historical timeline] A scrollable timeline of the monument's construction phases and events, linked to the scenes they belong to.
- [Visitor quiz] A short quiz per tour (5 questions typical) with scoring, built from the hotspot content.
- [Tour builder guide] Step-by-step workflow: plan stations, capture, stitch, author hotspots, publish — reusable for any monument.
What is included
- Assembled 360° capture rig (Raspberry Pi, camera modules, tripod mount, power bank)
- Capture script and station-planning guide
- Panorama stitching workflow documentation (open-source tools, troubleshooting)
- Complete WebXR tour web app source (viewer, hotspots, narration, timeline, quiz)
- Sample demo tour with included panoramas
- Content-authoring guide (hotspot data format, narration scripting, quiz format)
- Project report PDF (background, panoramic imaging, WebXR design, buyer-run capture procedure)
- PPT presentation for final review
- Viva Q&A preparation document (equirectangular projection, WebXR, stitching, hotspot math)
- Setup guide (rig assembly, first capture, first tour build)
Limitations & prerequisites
- Panorama quality depends on the camera used and the buyer's capture discipline — alignment failures from moving subjects or uneven exposure need re-shoots, and the guide is honest about this.
- The buyer must obtain permission before photographing a protected monument; many sites restrict tripods and commercial-style shooting, and the guide covers permissions explicitly.
- Stitching is a documented manual/semi-automatic workflow, not one-click software — it takes practice, and the report treats it as a skill the student learns.
- WebXR headset support depends on the browser and device; the Cardboard-style phone path and desktop drag-look always work as fallbacks.
- Narration, hotspot text and quiz content are authored by the buyer from their own research — the project ships the pipeline and sample content, not a finished monument encyclopedia.
- Very large panoramas are heavy to download; the guide covers resolution/quality trade-offs for web delivery.
Frequently Asked Questions
Do I need an expensive VR headset?
No. The tour works with mouse-drag on a desktop, with a phone in a low-cost Cardboard-style viewer, and with WebXR headsets where available.
How are the 360° photos taken?
With the included Raspberry Pi capture rig at planned stations around the monument; the capture script shoots overlapping frames that are stitched into panoramas.
Which monument does it cover?
Whichever one the buyer captures — the project is the capture-to-tour pipeline plus a sample demo tour. The buyer authors hotspots, narration and quiz for their chosen monument.
How hard is the stitching?
It is a documented semi-automatic workflow with troubleshooting for common failures (moving people, exposure mismatch). Expect to re-shoot some stations while learning.
Can I use it for a monument I can't visit?
Only with legally usable panoramas — the pipeline accepts any equirectangular panorama, but the buyer must respect photo permissions and licenses.
Is this project suitable for a final-year project?
Yes — for Computer Science, IT and Electronics programs. It demonstrates embedded capture hardware, panoramic imaging, WebXR development, content pipelines and UX design, all strong viva material. Suitable for B.E./B.Tech final-year projects in Computer Science, IT and Electronics.
Components & software requirements
- Raspberry Pi (any recent model) + camera module(s) or 360 camera + tripod mount
- Python capture script (timed/bracketed shooting, station logging)
- Open-source panorama stitching pipeline (documented step-by-step)
- WebXR / three.js-based 360° tour web app (single deployable app)
- Hotspot/narration/quiz content as editable data files
- Cardboard-style phone viewer compatible (no dedicated headset required)
Delivery information
Built-to-order project. Delivery timeline is shared after order confirmation based on current queue.
Support terms
Complete documentation, setup guide, and viva preparation included. Support for setup and explanation provided.