
More project photos (2)
The problem
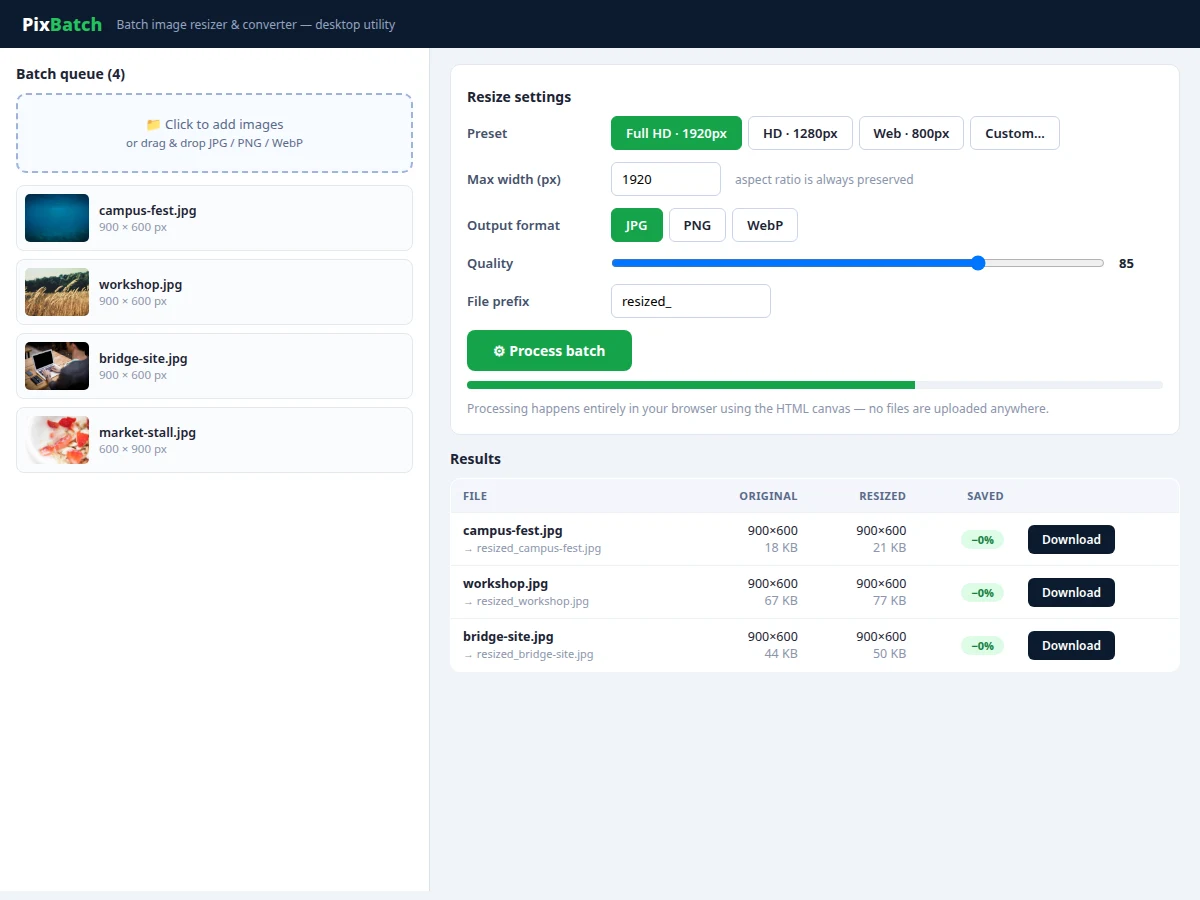
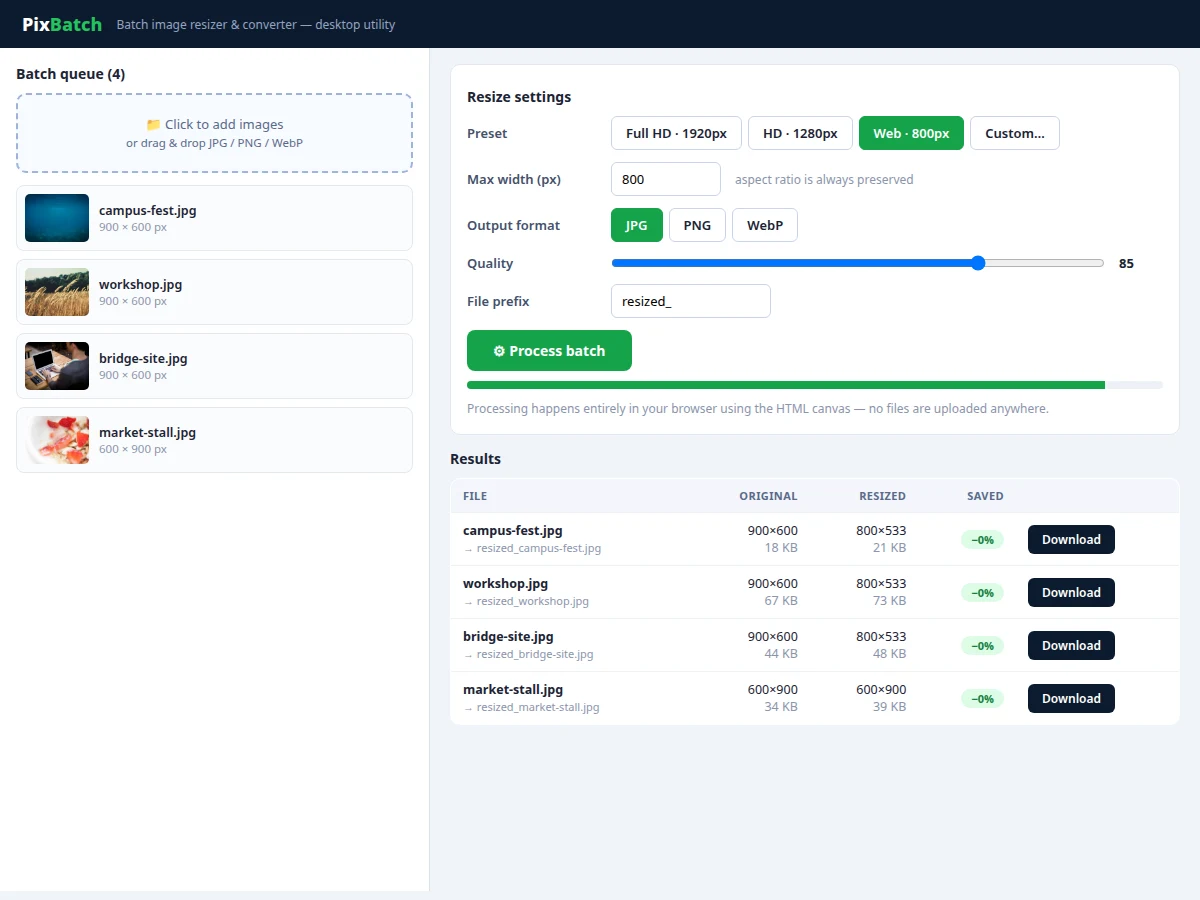
Resizing images one by one is drudgery: a student with 40 project photos, or a seller with 200 product shots, faces the same repetitive loop of open-resize-save in an editor. Online batch tools exist but require uploading personal photos to a stranger's server, and most cap file counts or watermark the output. This project builds a desktop batch image resizer and converter that processes entire queues locally. The user drops in any number of JPG, PNG or WebP files, selects a max-width preset (1920, 1280, 800 px or custom), picks an output format and quality, and the app resizes every image while preserving aspect ratio — reporting original vs resized dimensions and the percentage saved per file, with a before/after comparison view for any image. Because the pipeline runs in the browser engine's canvas, the tool works identically as a desktop app or a web page, fully offline.
How it works
- The user drags image files into the drop zone (or clicks to browse); each file is read locally and shown as a thumbnail with its native dimensions.
- The user picks a max-width preset or enters a custom width, selects JPG/PNG/WebP output, sets quality, and optionally a filename prefix.
- On "Process batch", each image is drawn onto an offscreen HTML canvas scaled so its width equals the target (scale capped at 1.0 — images are never upscaled).
- The canvas is serialized with
toDataURLin the chosen format and quality, producing the resized file entirely in memory. - A results table is built: original dimensions/size vs resized dimensions/size, with the percentage saved computed per file.
- Clicking a row opens the before/after comparison; each row's Download button saves that file with the configured prefix.
Tech stack:
- HTML5 Canvas API (resize pipeline)
- JavaScript FileReader API (local file intake)
- Electron (desktop packaging)
- HTML/CSS (queue and results UI)
- WebP/JPG/PNG encoders (browser-native)
| Parameter | Value |
|---|---|
| Input formats | JPG, PNG, WebP (any count per batch) |
| Output formats | JPG, PNG, WebP |
| Width presets | 1920 / 1280 / 800 px + custom |
| Quality range | 40–100 (slider) |
| Upscaling | Never — scale factor capped at 1.0 |
| Aspect ratio | Always preserved |
| Network needed | None — fully offline |
Project features
- [Batch queue] Drag-and-drop any number of JPG, PNG or WebP files; each shows a thumbnail with its original dimensions before processing.
- [Width presets] One-click targets — Full HD 1920 px, HD 1280 px, web 800 px — plus a custom width field; aspect ratio is always preserved automatically.
- [Format conversion] Output to JPG, PNG or WebP with a quality slider (40–100), so the same batch can be optimized for print or for fast web pages.
- [Per-file savings report] A results table shows original vs resized dimensions, file sizes and the percentage saved for every image — the numbers that justify the tool.
- [Before/after comparison] Click any processed row to see the original and resized images side by side with their dimensions.
- [Individual downloads] Each result has its own download button with an automatic renamed file (configurable prefix), plus the originals are never modified.
- [Fully offline] The canvas-based pipeline never uploads images; a folder of private photos stays private.
What is included
- Complete application source code (desktop + web-usable)
- Electron packaging configuration
- User manual with resize/convert walkthroughs
- Project report PDF (background, canvas scaling design, format trade-offs, methodology)
- PPT presentation for final review
- Viva Q&A preparation document (image formats, canvas API, lossy vs lossless, file handling)
Limitations & prerequisites
- Images are never upscaled — a 400 px wide photo stays 400 px even if the preset is 1920 px; upscaling would only invent pixels.
- No cropping, rotation or watermarking in this version; those are documented as planned extensions.
- Very large source images (50+ MP) are processed one at a time in memory and may be slow on low-RAM machines.
- EXIF metadata (camera settings, GPS) is not preserved in the resized output — noted honestly in the manual.
- Output quality below ~60 can show visible compression artifacts on detailed photos; the slider default is 85 as a balanced choice.
Frequently Asked Questions
Why not just use an online resizer?
Privacy and scale. Uploading hundreds of personal or client photos to a free website is risky, and most free tools cap batches or add watermarks. This tool processes unlimited files locally with no account.
Will resizing hurt image quality?
Downscaling with the quality slider at 85 keeps photos visually identical for screen use while typically cutting file size by 50–80%. The before/after view lets you verify each image.
Does it keep the aspect ratio?
Always. You set only the max width; height is computed proportionally. There is no stretch or squash mode by design.
Can it convert PNG to WebP in bulk?
Yes — format conversion is independent of resizing. Select WebP output and the whole queue converts, which is the fastest way to slim down a website's image folder.
What happens to my original files?
Nothing. The app only reads them; resized copies download with a filename prefix (default "resized_"), so originals are never overwritten.
Is this project suitable for a final-year project?
Yes — for Computer Science and IT programs. It demonstrates file handling, the canvas image pipeline, batch processing UX and practical image-format knowledge. Suitable for B.E./B.Tech final-year projects in Computer Science and Information Technology.
Components & software requirements
- HTML5 Canvas API (resize pipeline)
- JavaScript FileReader API (local file intake)
- Electron (desktop packaging)
- HTML/CSS (queue and results UI)
- WebP/JPG/PNG encoders (browser-native)
Delivery information
Built-to-order project. Delivery timeline is shared after order confirmation based on current queue.
Support terms
Complete documentation, setup guide, and viva preparation included. Support for setup and explanation provided.